

Application Process
To connect Ace Data Cloud in Open WebUI, first go to the Ace Data Cloud Console, obtain your API Token, and keep it for later use. If you have not logged in or registered yet, you will be automatically redirected to the login page to register and log in. After logging in or registering, you will automatically return to the current page.
When applying for the first time, free credits will be provided, allowing you to experience Ace Data Cloud’s model services for free.
If you have not logged in or registered yet, you will be automatically redirected to the login page to register and log in. After logging in or registering, you will automatically return to the current page.
When applying for the first time, free credits will be provided, allowing you to experience Ace Data Cloud’s model services for free.
Deploy and Configure Ace Data Cloud
Open WebUI connects to OpenAI-compatible endpoints through environment variables. You can deploy it with a single Docker command (replace{token} with your Token):
Open
http://your-server-IP:3000; the first registered account automatically becomes the administrator. Note the Base URL path rules:
After logging in, go to Admin Panel → Settings → Connections and click “Verify Connection” to verify; in Settings → Models, you can filter and Pin frequently used models.
In addition to using environment variables, Open WebUI also supports adding connections directly in the interface: go to Admin Settings → Connections, click ➕ and enter the URL (https://api.acedata.cloud/v1) and API Key. Open WebUI will automatically call/modelsto retrieve the model list. See the official documentation Starting With OpenAI-Compatible Servers for details.
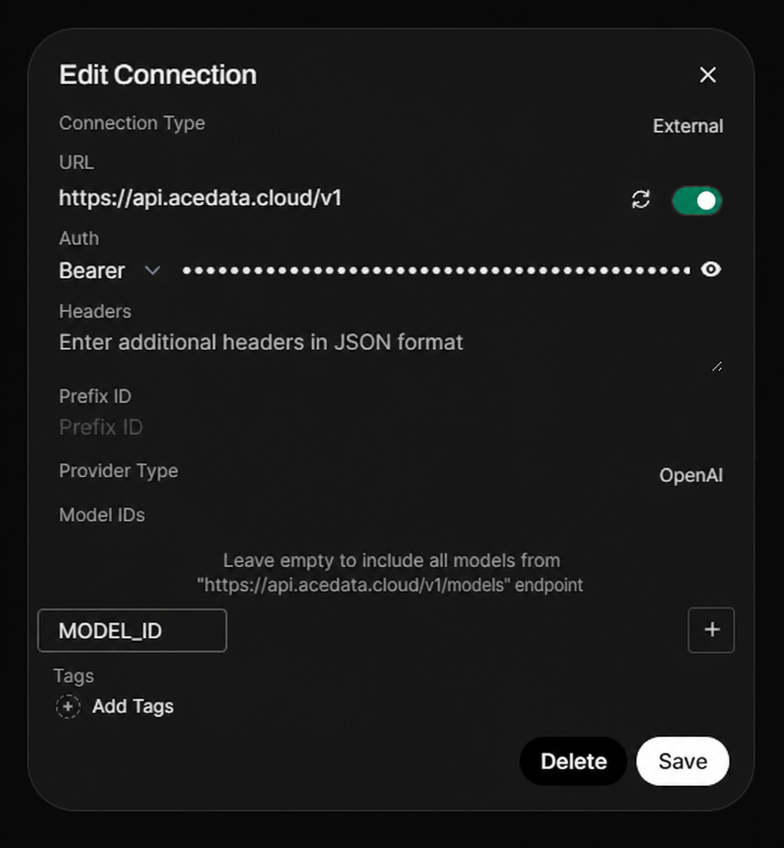
MODEL_IDis only used to demonstrate an optional allow list; when left blank, all models returned by/modelswill be displayed.
Select a Model
The model catalog will continue to be updated. Prioritize using the model list automatically loaded by the client; when manual entry is required, first requestGET https://api.acedata.cloud/v1/models to obtain the current model IDs, then select according to the context, image, and tool-calling capabilities supported by the client.
Verify the Integration
If you are unsure whether the issue is with Open WebUI or the network, you can first use curl to directly verify the endpoint (replace{token} with your Token):
chat.completion object indicates that both the Token and endpoint are ready; if HTTP 403 used_up is returned, it means the Token is valid but the balance is insufficient. You can recharge in the Console.
Advanced: Knowledge Base and Multi-User Access
Open WebUI’s knowledge base (RAG) uses ChromaDB to store vectors by default. The embedding model can be specified astext-embedding-3-large (through Ace Data Cloud). The original document text exists only on your server, and only matched segments will be sent to the model. In Admin Panel → Users, you can manage user roles (Pending / User / Admin); it is recommended to set “Default User Role” to pending, so new users must be reviewed before use, preventing outsiders from registering freely and consuming credits. If using an nginx reverse proxy, please add proxy_buffering off; and client_max_body_size 100M;.
Frequently Asked Questions
Connection error / 404 is displayed
Usually,OPENAI_API_BASE_URL was written as .../openai/v1 or is missing /v1. Change it to https://api.acedata.cloud/v1.
Unable to chat after uploading documents
In the RAG settings of the Admin Panel, selecttext-embedding-3-large (OpenAI provider) as the embedding model.
Data is lost after the container restarts
You need to mount the data volume-v open-webui:/app/backend/data when starting.