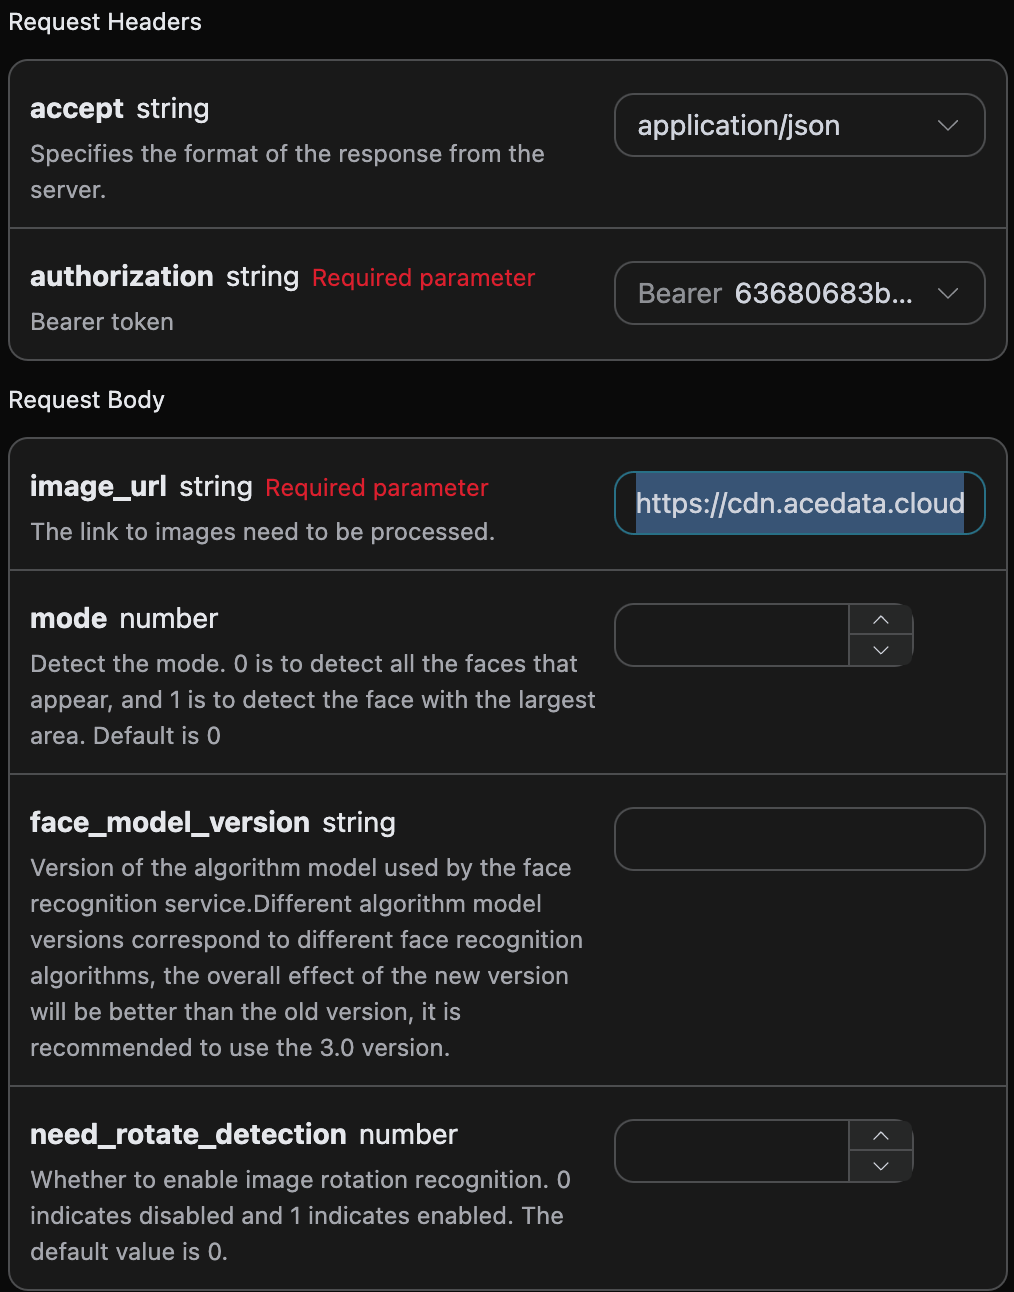
This article will introduce a Facial Feature Localization API integration guide, which can perform facial feature localization (also known as facial keypoint localization) by inputting an image, calculating 90 points that form the facial contour, including eyebrows (8 points each for left and right), eyes (8 points each for left and right), nose (13 points), mouth (22 points), face shape contour (21 points), and pupils (2 points).

Application Process

To use the API, you need to first apply for the corresponding service on the Facial Feature Localization API page. After entering the page, click the “Acquire” button, as shown in the image below: If you are not logged in or registered, you will be automatically redirected to the login page inviting you to register and log in. After logging in or registering, you will be automatically returned to the current page. Upon your first application, there will be a free quota provided, allowing you to use the API for free.

Basic Usage

First, understand the basic usage method, which is to input the image link to obtain the processed result image. You need to simply pass an image_url field, with the facial image shown below:

Next, we can fill in the corresponding content on the interface, as shown in the image below:

Here we can see that we have set the Request Headers, including:
  • accept: the format of the response result you want to receive, here filled as application/json, which means JSON format.
  • authorization: the key to call the API, which can be directly selected after application.
Additionally, we set the Request Body, including:
  • image_url: the link to the facial image that needs to be processed.
  • mode: detection mode. 0 is to detect all faces present, 1 is to detect the largest face area. The default is 0.
  • face_model_version: the algorithm model version used for facial recognition service, the default is 3.0.
  • need_rotate_detection: whether to enable image rotation recognition support. 0 means not enabled, 1 means enabled. The default is 0.
After selection, you can find that the corresponding code is also generated on the right side, as shown in the image below:

Click the “Try” button to conduct a test, as shown in the image above, and we obtained the following result:
{
  "image_width": 690,
  "image_height": 920,
  "face_model_version": "3.0",
  "face_shape_set": [
    {
      "face_profile": [
        {
          "x": 294,
          "y": 207
        },
        {
          "x": 289,
          "y": 216
        },
        {
          "x": 286,
          "y": 226
        },
        {
          "x": 284,
          "y": 236
        },
        {
          "x": 283,
          "y": 246
        },
        {
          "x": 283,
          "y": 256
        },
        {
          "x": 284,
          "y": 266
        },
        {
          "x": 286,
          "y": 276
        },
        {
          "x": 289,
          "y": 285
        },
        {
          "x": 294,
          "y": 294
        },
        {
          "x": 301,
          "y": 301
        },
        {
          "x": 314,
          "y": 306
        },
        {
          "x": 327,
          "y": 307
        },
        {
          "x": 340,
          "y": 306
        },
        {
          "x": 353,
          "y": 302
        },
        {
          "x": 365,
          "y": 296
        },
        {
          "x": 374,
          "y": 287
        },
        {
          "x": 382,
          "y": 276
        },
        {
          "x": 387,
          "y": 264
        },
        {
          "x": 392,
          "y": 251
        },
        {
          "x": 396,
          "y": 238
        }
      ],
      "left_eye": [
        {
          "x": 298,
          "y": 208
        },
        {
          "x": 301,
          "y": 212
        },
        {
          "x": 305,
          "y": 214
        },
        {
          "x": 309,
          "y": 215
        },
        {
          "x": 314,
          "y": 216
        },
        {
          "x": 313,
          "y": 210
        },
        {
          "x": 309,
          "y": 207
        },
        {
          "x": 303,
          "y": 206
        }
      ],
      "right_eye": [
        {
          "x": 363,
          "y": 229
        },
        {
          "x": 358,
          "y": 230
        },
        {
          "x": 353,
          "y": 229
        },
        {
          "x": 347,
          "y": 227
        },
        {
          "x": 342,
          "y": 224
        },
        {
          "x": 348,
          "y": 221
        },
        {
          "x": 354,
          "y": 221
        },
        {
          "x": 360,
          "y": 223
        }
      ],
      "left_eye_brow": [
        {
          "x": 296,
          "y": 196
        },
        {
          "x": 302,
          "y": 197
        },
        {
          "x": 308,
          "y": 198
        },
        {
          "x": 313,
          "y": 200
        },
        {
          "x": 319,
          "y": 202
        },
        {
          "x": 315,
          "y": 195
        },
        {
          "x": 309,
          "y": 192
        },
        {
          "x": 302,
          "y": 192
        }
      ],
      "right_eye_brow": [
        {
          "x": 377,
          "y": 221
        },
        {
          "x": 369,
          "y": 217
        },
        {
          "x": 360,
          "y": 213
        },
        {
          "x": 350,
          "y": 211
        },
        {
          "x": 341,
          "y": 208
        },
        {
          "x": 351,
          "y": 204
        },
        {
          "x": 362,
          "y": 206
        },
        {
          "x": 372,
          "y": 211
        }
      ],
      "mouth": [
        {
          "x": 296,
          "y": 262
        },
        {
          "x": 297,
          "y": 269
        },
        {
          "x": 299,
          "y": 276
        },
        {
          "x": 305,
          "y": 281
        },
        {
          "x": 315,
          "y": 283
        },
        {
          "x": 326,
          "y": 282
        },
        {
          "x": 335,
          "y": 277
        },
        {
          "x": 325,
          "y": 269
        },
        {
          "x": 315,
          "y": 262
        },
        {
          "x": 309,
          "y": 261
        },
        {
          "x": 305,
          "y": 258
        },
        {
          "x": 300,
          "y": 259
        },
        {
          "x": 299,
          "y": 265
        },
        {
          "x": 303,
          "y": 269
        },
        {
          "x": 307,
          "y": 272
        },
        {
          "x": 316,
          "y": 275
        },
        {
          "x": 325,
          "y": 276
        },
        {
          "x": 326,
          "y": 272
        },
        {
          "x": 317,
          "y": 269
        },
        {
          "x": 308,
          "y": 265
        },
        {
          "x": 304,
          "y": 263
        },
        {
          "x": 300,
          "y": 262
        }
      ],
      "nose": [
        {
          "x": 311,
          "y": 242
        },
        {
          "x": 325,
          "y": 220
        },
        {
          "x": 319,
          "y": 226
        },
        {
          "x": 313,
          "y": 231
        },
        {
          "x": 307,
          "y": 236
        },
        {
          "x": 302,
          "y": 243
        },
        {
          "x": 306,
          "y": 249
        },
        {
          "x": 311,
          "y": 252
        },
        {
          "x": 318,
          "y": 254
        },
        {
          "x": 329,
          "y": 253
        },
        {
          "x": 327,
          "y": 243
        },
        {
          "x": 326,
          "y": 235
        },
        {
          "x": 326,
          "y": 228
        }
      ],
      "left_pupil": [
        {
          "x": 310,
          "y": 211
        }
      ],
      "right_pupil": [
        {
          "x": 357,
          "y": 225
        }
      ]
    }
  ]
}
You can see that we have obtained relevant information about the face in the image, including specific information about the positioning of facial features (facial key points), the version of the algorithm model used for face recognition, and other content. The field descriptions are as follows:
  • image_width: The requested image width.
  • image_height: The requested image height.
  • face_model_version: The algorithm model version used for face recognition.
  • face_shape_set: Specific information for facial feature positioning (facial key points).
    • face_profile: 21 points describing the face shape contour.
      • x: x-coordinate
      • y: y-coordinate
    • left_eye: 8 points describing the contour of the left eye.
      • x: x-coordinate
      • y: y-coordinate
    • right_eye: 8 points describing the contour of the right eye.
      • x: x-coordinate
      • y: y-coordinate
    • left_eye_brow: 8 points describing the contour of the left eyebrow.
      • x: x-coordinate
      • y: y-coordinate
    • right_eye_brow: 8 points describing the contour of the right eyebrow.
      • x: x-coordinate
      • y: y-coordinate
    • mouth: 22 points describing the contour of the mouth.
      • x: x-coordinate
      • y: y-coordinate
    • nose: 13 points describing the contour of the nose.
      • x: x-coordinate
      • y: y-coordinate
    • left_pupil: 1 point of the left pupil contour.
      • x: x-coordinate
      • y: y-coordinate
    • right_pupil: 1 point of the right pupil contour.
      • x: x-coordinate
      • y: y-coordinate
Additionally, if you want to generate the corresponding integration code, you can directly copy it, for example, the CURL code is as follows:
curl -X POST 'https://api.acedata.cloud/face/analyze' \
-H 'accept: application/json' \
-H 'authorization: Bearer {token}' \
-H 'content-type: application/json' \
-d '{
  "image_url": "https://cdn.acedata.cloud/lrbtcn.jpg"
}'
The Python integration code is as follows:
import requests

url = "https://api.acedata.cloud/face/analyze"

headers = {
    "accept": "application/json",
    "authorization": "Bearer {token}",
    "content-type": "application/json"
}

payload = {
    "image_url": "https://cdn.acedata.cloud/lrbtcn.jpg"
}

response = requests.post(url, json=payload, headers=headers)
print(response.text)

Error Handling

When calling the API, if an error occurs, the API will return the corresponding error code and message. For example:
  • 400 token_mismatched: Bad request, possibly due to missing or invalid parameters.
  • 400 api_not_implemented: Bad request, possibly due to missing or invalid parameters.
  • 401 invalid_token: Unauthorized, invalid or missing authorization token.
  • 429 too_many_requests: Too many requests, you have exceeded the rate limit.
  • 500 api_error: Internal server error, something went wrong on the server.

Error Response Example

{
  "success": false,
  "error": {
    "code": "api_error",
    "message": "fetch failed"
  },
  "trace_id": "2cf86e86-22a4-46e1-ac2f-032c0f2a4e89"
}

Conclusion

Through this document, you have learned how to use the facial feature positioning API to perform facial feature positioning on the input image. We hope this document helps you better integrate and use the API. If you have any questions, please feel free to contact our technical support team.