Application Process
To use the Kling Videos Generation API, first go to the Ace Data Cloud Console to obtain your API Token for future use.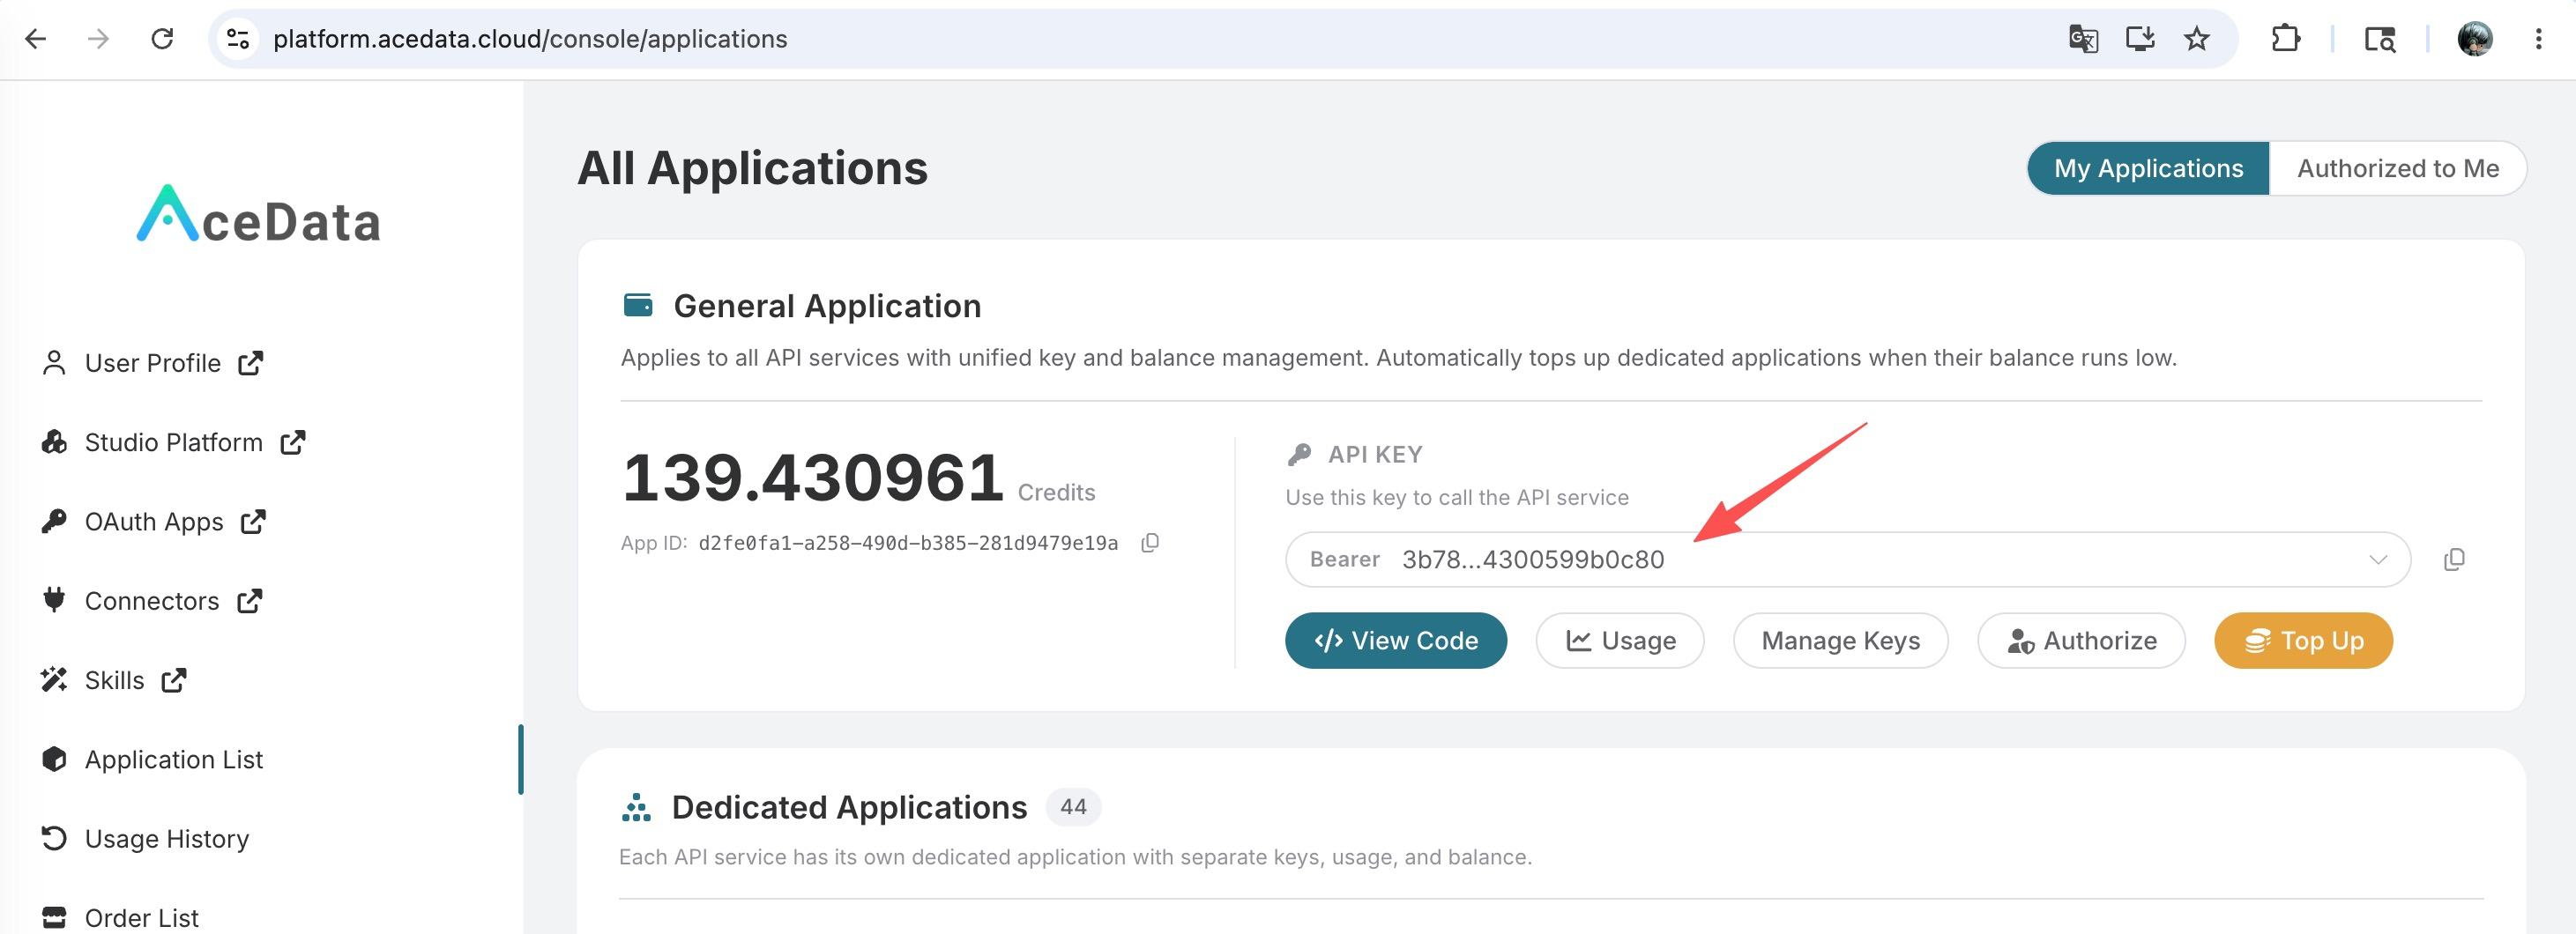 If you are not logged in or registered, you will be automatically redirected to the login page, inviting you to register and log in. After completing this, you will be automatically returned to the current page.
One API Token can call all services on the platform without needing to apply separately for each service. The first application will grant a free quota for a trial experience; when the quota is insufficient, you can recharge the general balance in the console.
If you are not logged in or registered, you will be automatically redirected to the login page, inviting you to register and log in. After completing this, you will be automatically returned to the current page.
One API Token can call all services on the platform without needing to apply separately for each service. The first application will grant a free quota for a trial experience; when the quota is insufficient, you can recharge the general balance in the console.
📘 Complete Documentation: Kling Videos Generation API →
Basic Usage
First, understand the basic usage, which involves inputting the promptprompt, the generation action action, the first frame reference image start_image_url, and the model model to obtain the processed result. You first need to simply pass a field action with the value text2video, which mainly includes three actions: text-to-video (text2video), image-to-video (image2video), and video extension (extend). Then, we also need to input the model model, which currently includes kling-v1, kling-v1-6, kling-v2-master, kling-v2-1-master, kling-v2-5-turbo, kling-v2-6, kling-v3, kling-v3-omni, and kling-o1, with specific details as follows:
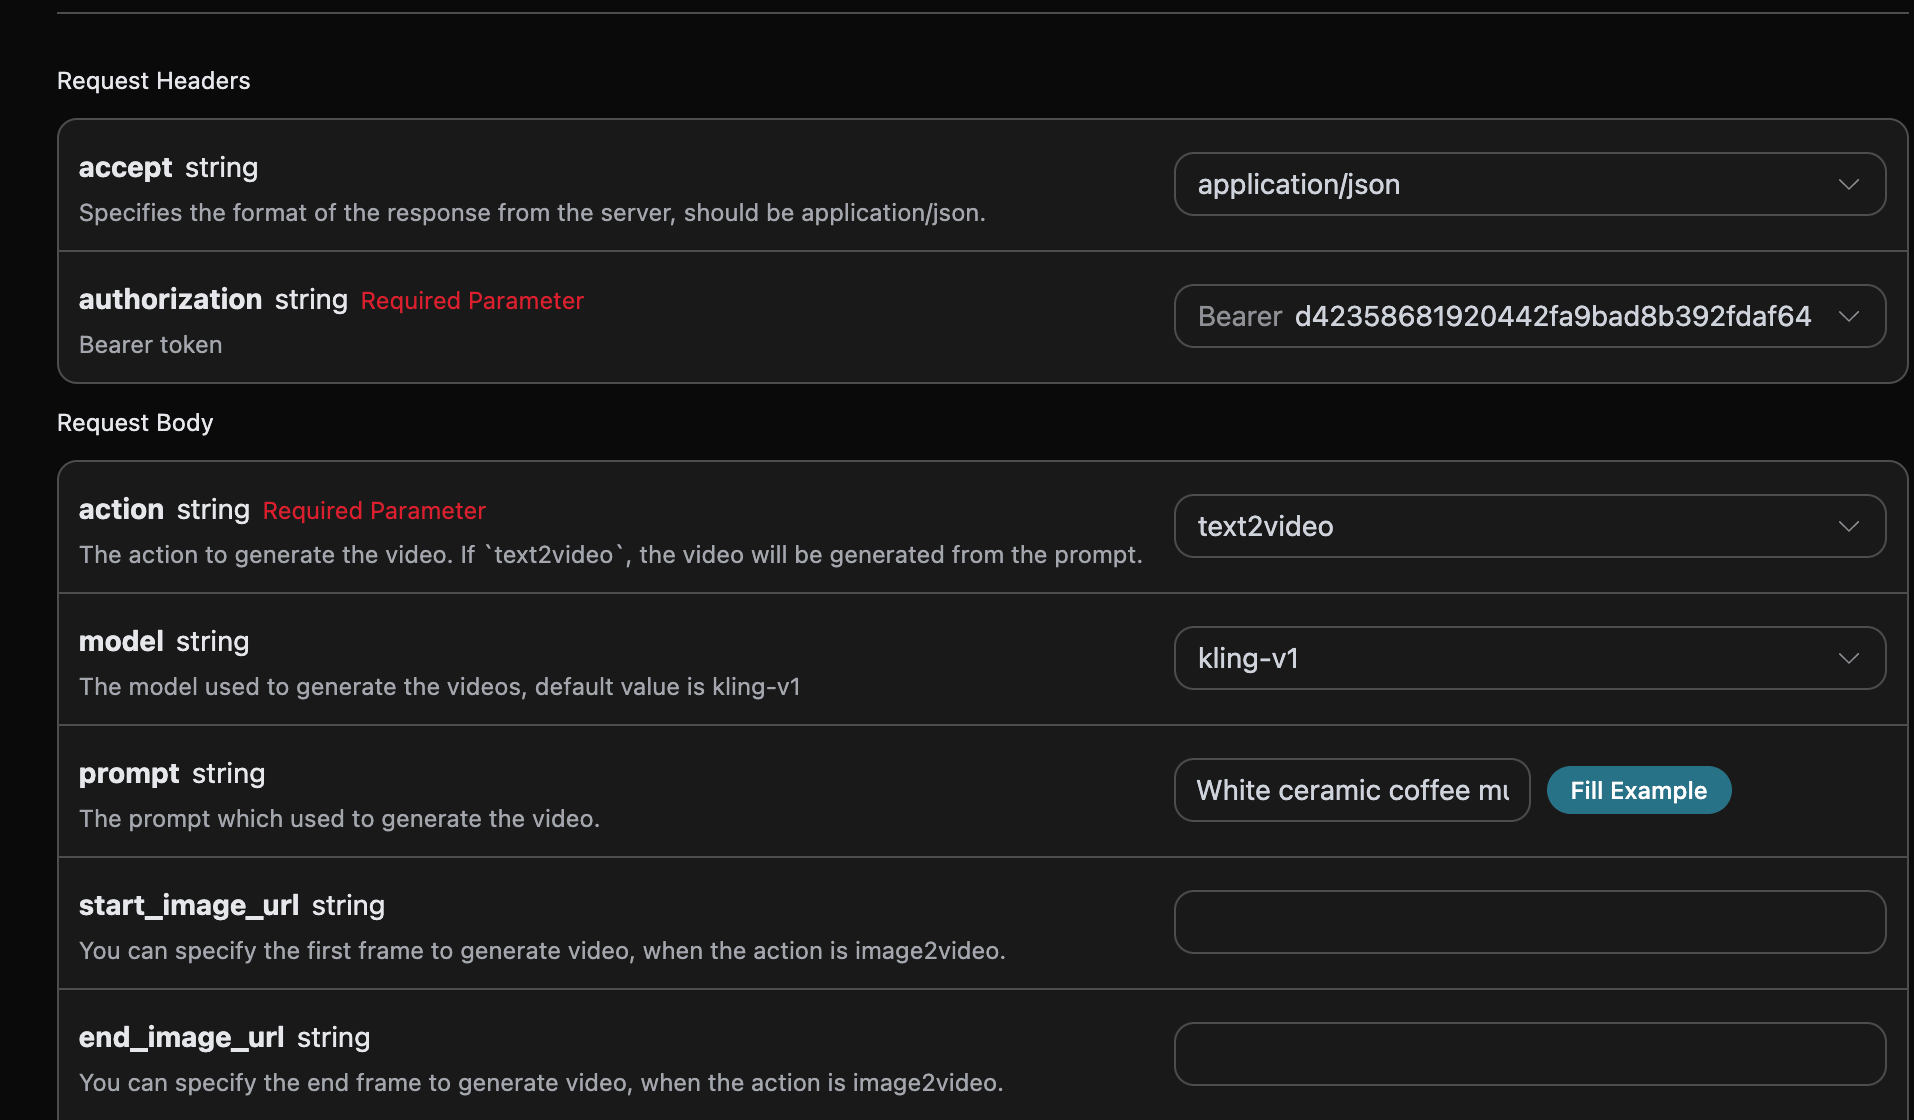
accept: the format of the response result you want to receive, filled in asapplication/json, which means JSON format.authorization: the key to call the API, which can be directly selected after application.
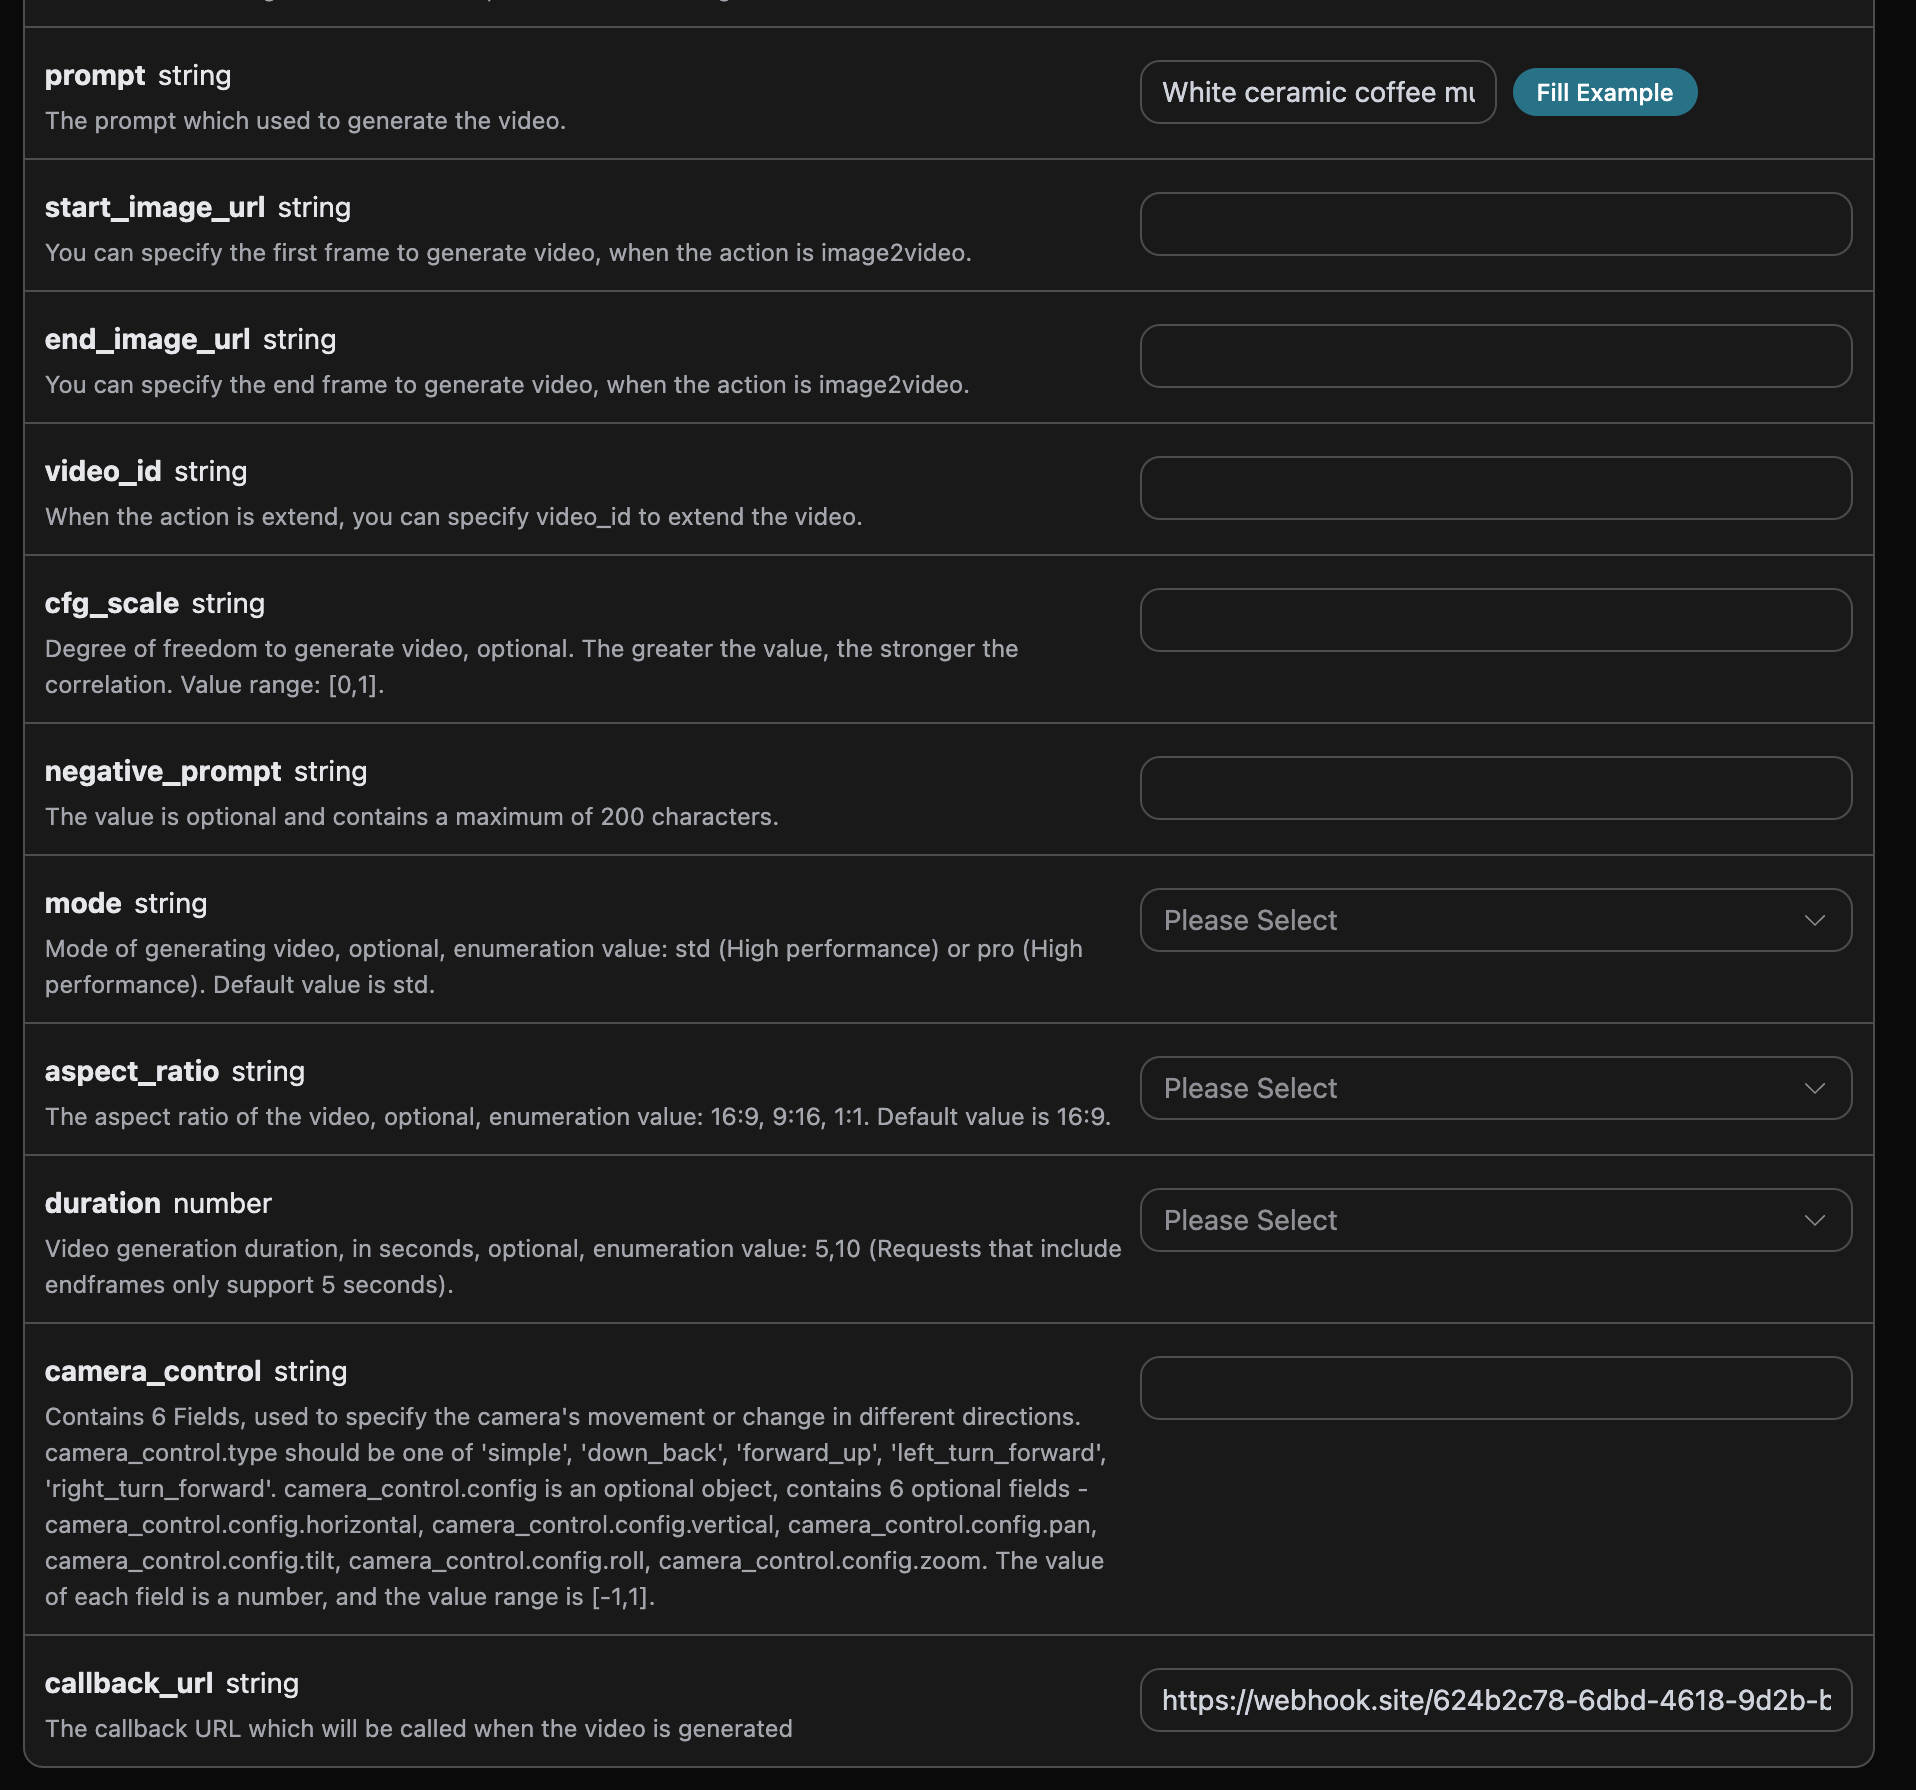
model: the model for generating the video, mainly includingkling-v1,kling-v1-6,kling-v2-master,kling-v2-1-master,kling-v2-5-turbo,kling-v2-6,kling-v3,kling-v3-omni, andkling-o1.mode: the mode for generating the video, with optional values of standard modestd, fast modepro, and native 4K mode4k. The4kmode only supportskling-v3andkling-v3-omni, and is incompatible withcamera_control(camera movement control).action: the action for this video generation task, mainly including three actions: text-to-video (text2video), image-to-video (image2video), and video extension (extend).start_image_url: when selecting the image-to-video actionimage2video, the first frame reference image link must be uploaded.end_image_url: optional for image-to-video, specifies the last frame.duration: video duration, in seconds.kling-v3andkling-v3-omnisupport integer durations of 3-15 seconds;kling-o1only supports 5 seconds; other models support 5 or 10 seconds.generate_audio: whether to generate audio synchronously, optional, boolean value. Supportskling-v3,kling-v3-omni, andkling-v2-6(only in pro mode). Default isfalse.aspect_ratio: video aspect ratio, optional, supports16:9,9:16,1:1, default is16:9.cfg_scale: correlation strength, range [0,1], larger values are more aligned with the prompt.camera_control: optional, parameters to control camera movement, supports type/simple presets and configurations such as horizontal, vertical, pan, tilt, roll, zoom, etc.negative_prompt: optional, reverse prompt words that you do not want to appear, up to 200 characters.image_list: Omni reference image list, applicable to modelskling-o1andkling-v3-omni, usage is described in the section “Omni All-Purpose Reference” below.video_list: Omni reference video list (supports video editing), applicable to modelskling-o1andkling-v3-omni, usage is described in the section “Omni All-Purpose Reference” below.prompt: prompt words.callback_url: the URL to receive callback results.async: optional, when set totrue, the interface immediately returnstask_id, no need to providecallback_url, and then the result can be polled through the corresponding task query interface.
success: the status of the video generation task at this time.task_id: the ID of the video generation task at this time.video_id: the video ID of the video generation task at this time.video_url: the video link of the video generation task at this time.duration: the duration of the video generation task at this time.state: the status of the video generation task at this time.
data result.
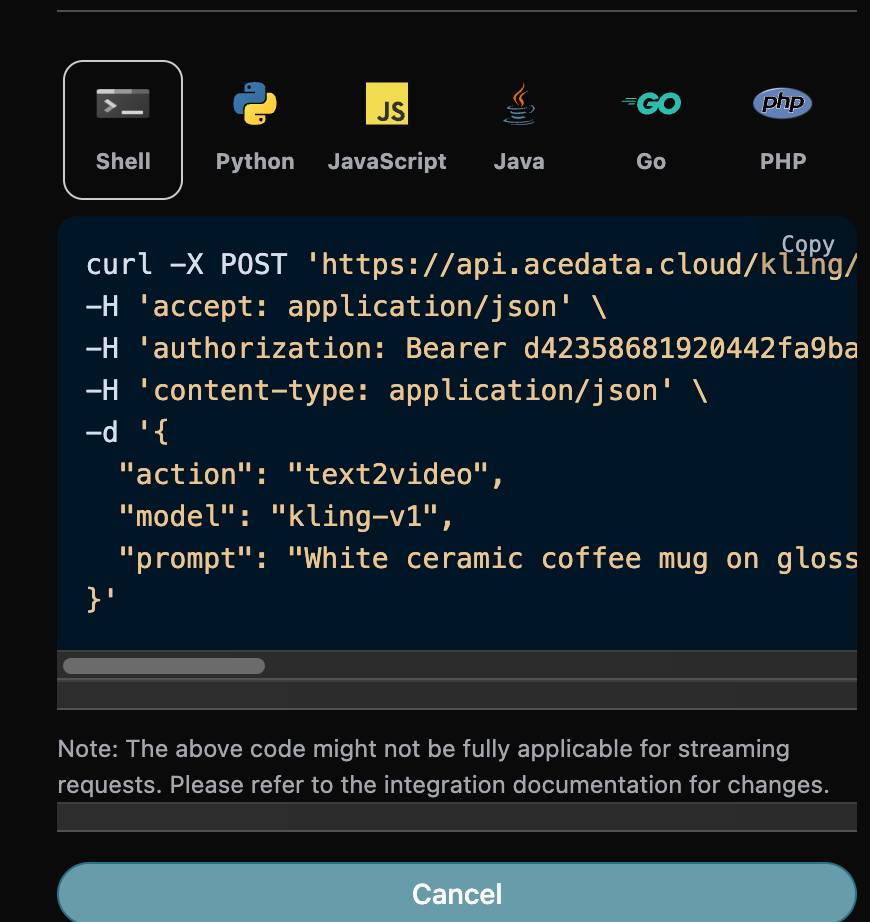
Additionally, if you want to generate the corresponding integration code, you can directly copy it, for example, the CURL code is as follows:
Model Capability Matrix
Different models have varying support for parameters. The following matrix is organized from the Kling official video models documentation. Please verify that the currentmodel / mode / duration combination supports the features you need before calling, otherwise, upstream will return errors such as model/mode/duration(...) is not supported with image_tail.
Notes:
mode=4kis only supported bykling-v3andkling-v3-omni; it is mutually exclusive withcamera_control.end_image_urlcan only be used withstart_image_urlwhenaction=image2video. Providing onlyend_image_url(withoutstart_image_url) will be rejected.kling-v3/kling-v3-omniaccept any integerdurationfrom 3 to 15 seconds;kling-o1only accepts 5; other models only accept 5 or 10.generate_audiodefaults tofalse. Onlykling-v3,kling-v3-omni, andkling-v2-6(pro mode) support it.
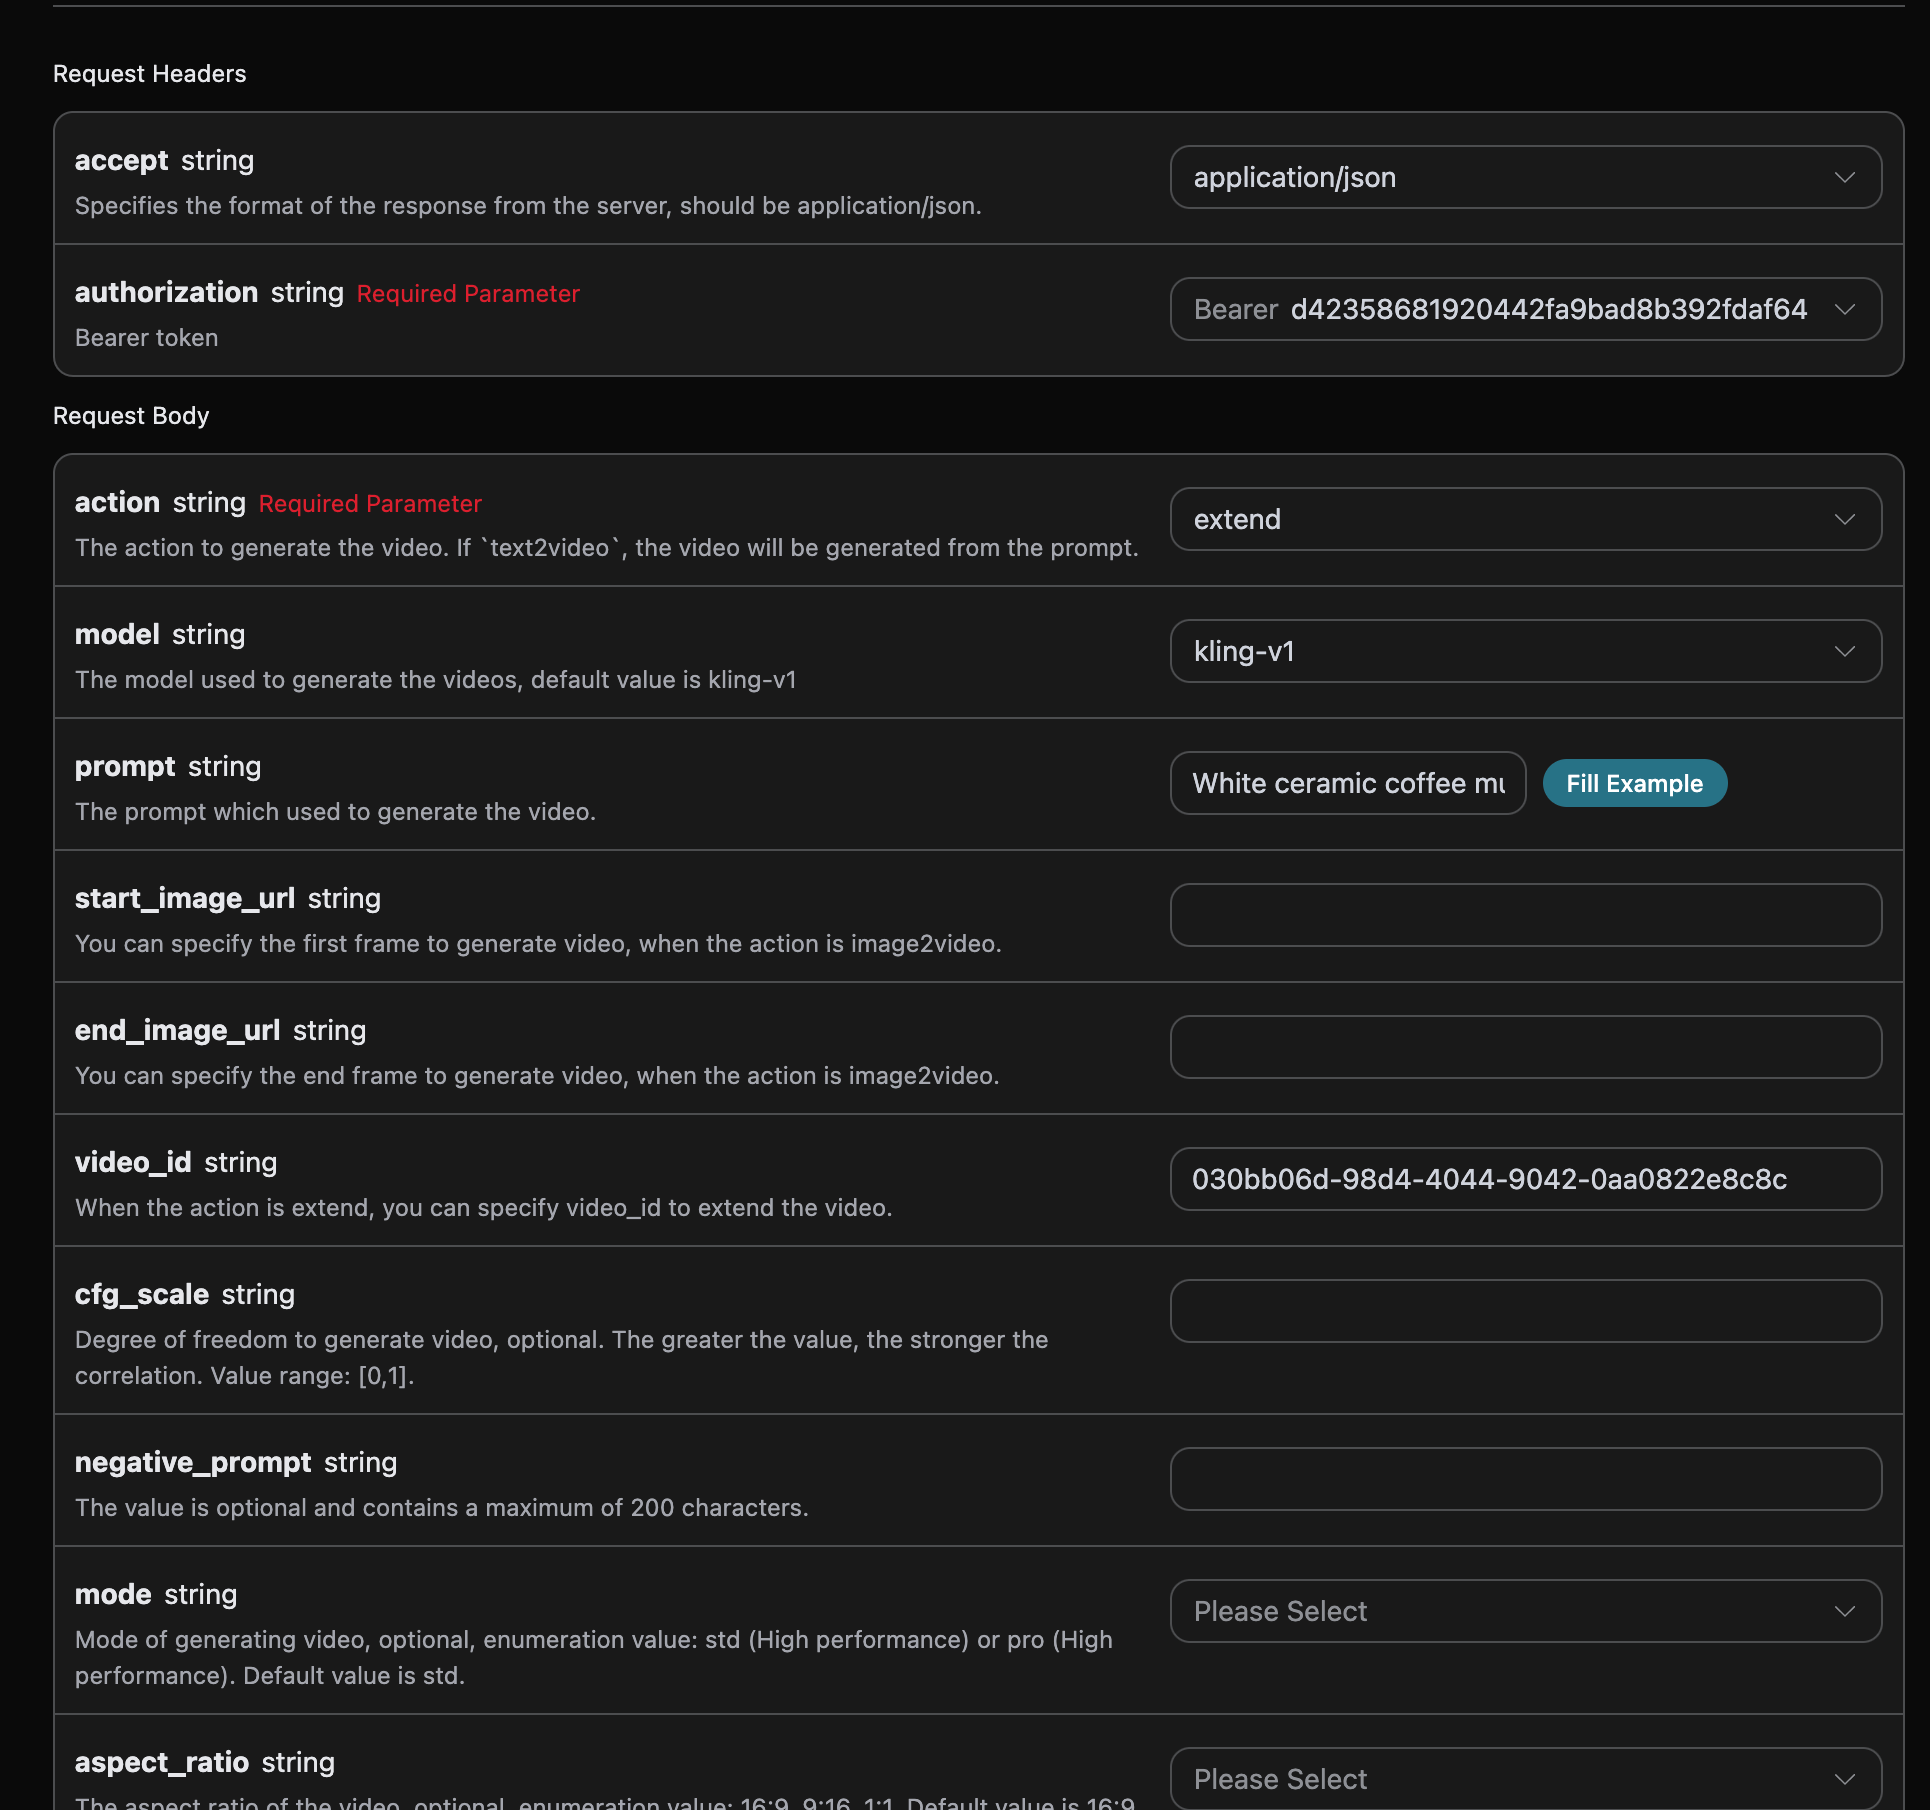
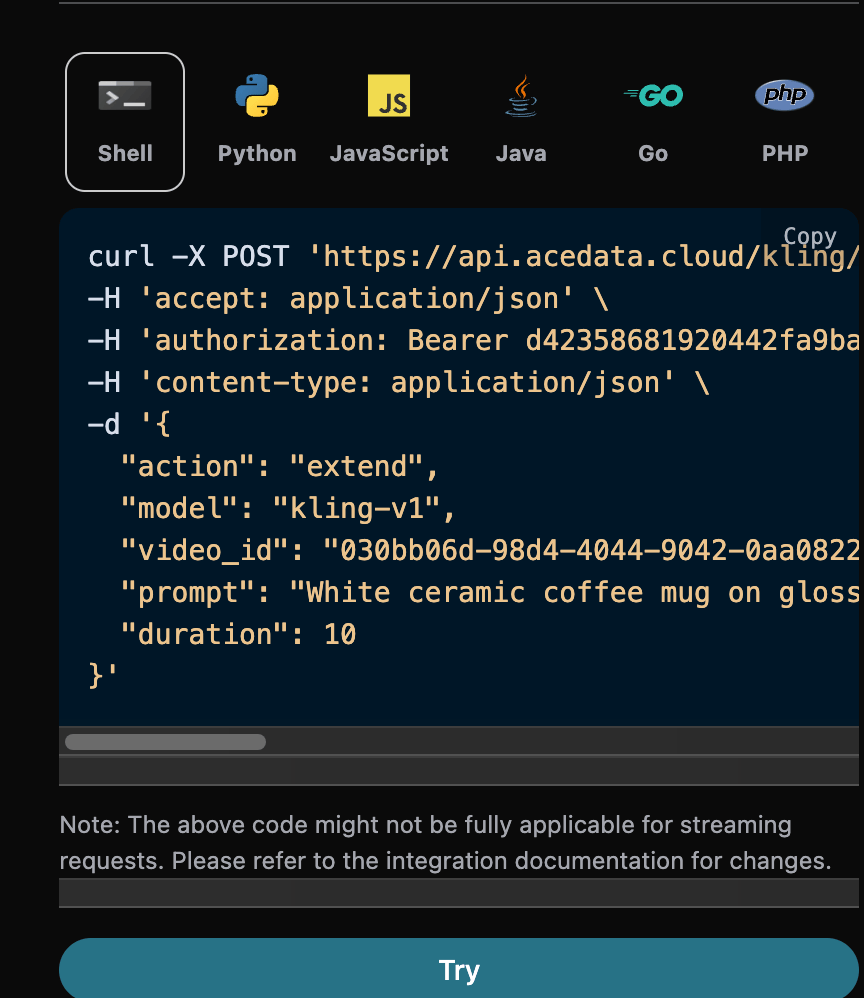
Video Extension Functionality
If you want to continue generating a Kling video that has already been created, you can set the parameteraction to extend and input the ID of the video you want to continue generating. The video ID can be obtained based on basic usage, as shown in the image below:

Note that the video_id here is the ID of the generated video. If you do not know how to generate a video, you can refer to the basic usage mentioned above.
Next, we must fill in the prompt for the next step to customize the generated video, specifying the following content:
model: The model for generating the video, mainlykling-v1,kling-v1-5, andkling-v1-6.mode: The mode for generating the video, with optional values of standard modestd, high-speed modepro, and native 4K mode4k(only supported bykling-v3andkling-v3-omni, incompatible with camera control).duration: The duration of this video generation task, mainly including 5s and 10s.start_image_url: When selecting the image-to-video actionimage2video, the first frame reference image link must be uploaded.prompt: The prompt.
Omni Universal Reference (Video Editing / Reference Video / Multi-Image Reference)
kling-o1 and kling-v3-omni are two independent models, both supporting “universal reference” capabilities. Based on text-to-video (action=text2video), additional reference images or videos can be provided to achieve multi-image reference, reference video, and direct editing of existing videos.
Core Agreement: Reference materials must be referenced in the prompt in the form of <<<image_1>>>, <<<video_1>>> (with numbering starting from 1) corresponding to the positions in image_list / video_list, for the model to apply these references. If materials are provided without being referenced in the prompt, they will be ignored.
Safety Note: The current API does not openOmni requests do not supportelement_list. The upstream ID of the Kling Element Library belongs to the provider account namespace. Before providing tenant isolation through the Element Management API, customers should useimage_listto pass in the main reference images.
negative_prompt, cfg_scale, or camera_control, and cannot use mode=4k. When including reference videos, generate_audio must be false.
Reference Video and Video Editing (video_list)
video_list is used to pass in reference videos, which is the most commonly used scenario for this capability. The fields of the array elements are as follows:
video_url: Reference video link, cannot be empty. Requirements: format MP4/MOV; resolution 720px–2160px; duration 3–10 seconds; frame rate 24–60fps; file size ≤200MB; up to 1 video.refer_type: Reference type, optionalbase(default, the basic video to be edited, i.e., “directly edit the video”, can add/delete/modify elements, change composition, change style, change color, change weather, etc.) orfeature(feature reference, reference its style / camera movement / continuation of the next shot).keep_original_sound: Whether to keep the original video audio, optionalyes(keep) orno(remove).
Note: When a reference video exists,An example of CURL for editing an existing video (changing the video to an anime style) is as follows:generate_audiomust befalse. Videos withrefer_type=basecannot specify the first frame / last frame.
Multi-Image Reference (image_list)
image_list is used to pass in reference images (elements / scenes / styles, etc.), the fields of the array elements are as follows:
image_url: Reference image link, cannot be empty. Requirements: format .jpg/.jpeg/.png; file size ≤10MB; shortest side ≥300px; aspect ratio 1:2.5 ~ 2.5:1.type: Optional. If not provided, treated as a pure reference image; iffirst_frame/end_frameis provided, treated as the first frame / last frame (equivalent tostart_image_url/end_image_url).
prompt as <<<image_1>>>, <<<image_2>>>. Quantity limit: if there is no reference video, reference images ≤ 7; if there is a reference video, reference images ≤ 4. If only the first / last frame is provided, start_image_url / end_image_url can also be used directly, but the last frame must be used together with the first frame.
Note: If bothAn example of CURL for generating a video with multi-image reference:start_image_url/end_image_urlandimage_listare provided, the first / last frame will be placed beforeimage_list, which may affect the corresponding relationship of<<<image_N>>>. It is recommended to choose one: if first / last frames are needed, specify directly inimage_listusingtype, do not mix withstart_image_url/end_image_url.
Asynchronous Callback
Due to the relatively long generation time of the Kling Videos Generation API, approximately 1-2 minutes, if the API does not respond for a long time, the HTTP request will keep the connection open, leading to additional system resource consumption. Therefore, this API also provides support for asynchronous callbacks. The overall process is: when the client initiates a request, an additionalcallback_url field is specified. After the client initiates the API request, the API will immediately return a result containing a task_id field information, representing the current task ID. When the task is completed, the result of the generated video will be sent to the client-specified callback_url in the form of a POST JSON, which also includes the task_id field, allowing the task result to be associated by ID.
Let’s understand how to operate specifically through an example.
First, the Webhook callback is a service that can receive HTTP requests, and developers should replace it with the URL of their own HTTP server. For demonstration purposes, a public Webhook sample site https://webhook.site/ is used, and opening this site will provide a Webhook URL, as shown in the image:
 Copy this URL, and it can be used as a Webhook. The sample here is
 https://webhook.site/624b2c78-6dbd-4618-9d2b-b32eade6d8c3.
Next, we can set the callback_url field to the above Webhook URL, while filling in the corresponding parameters, as shown in the image:
https://webhook.site/624b2c78-6dbd-4618-9d2b-b32eade6d8c3, as shown in the image:
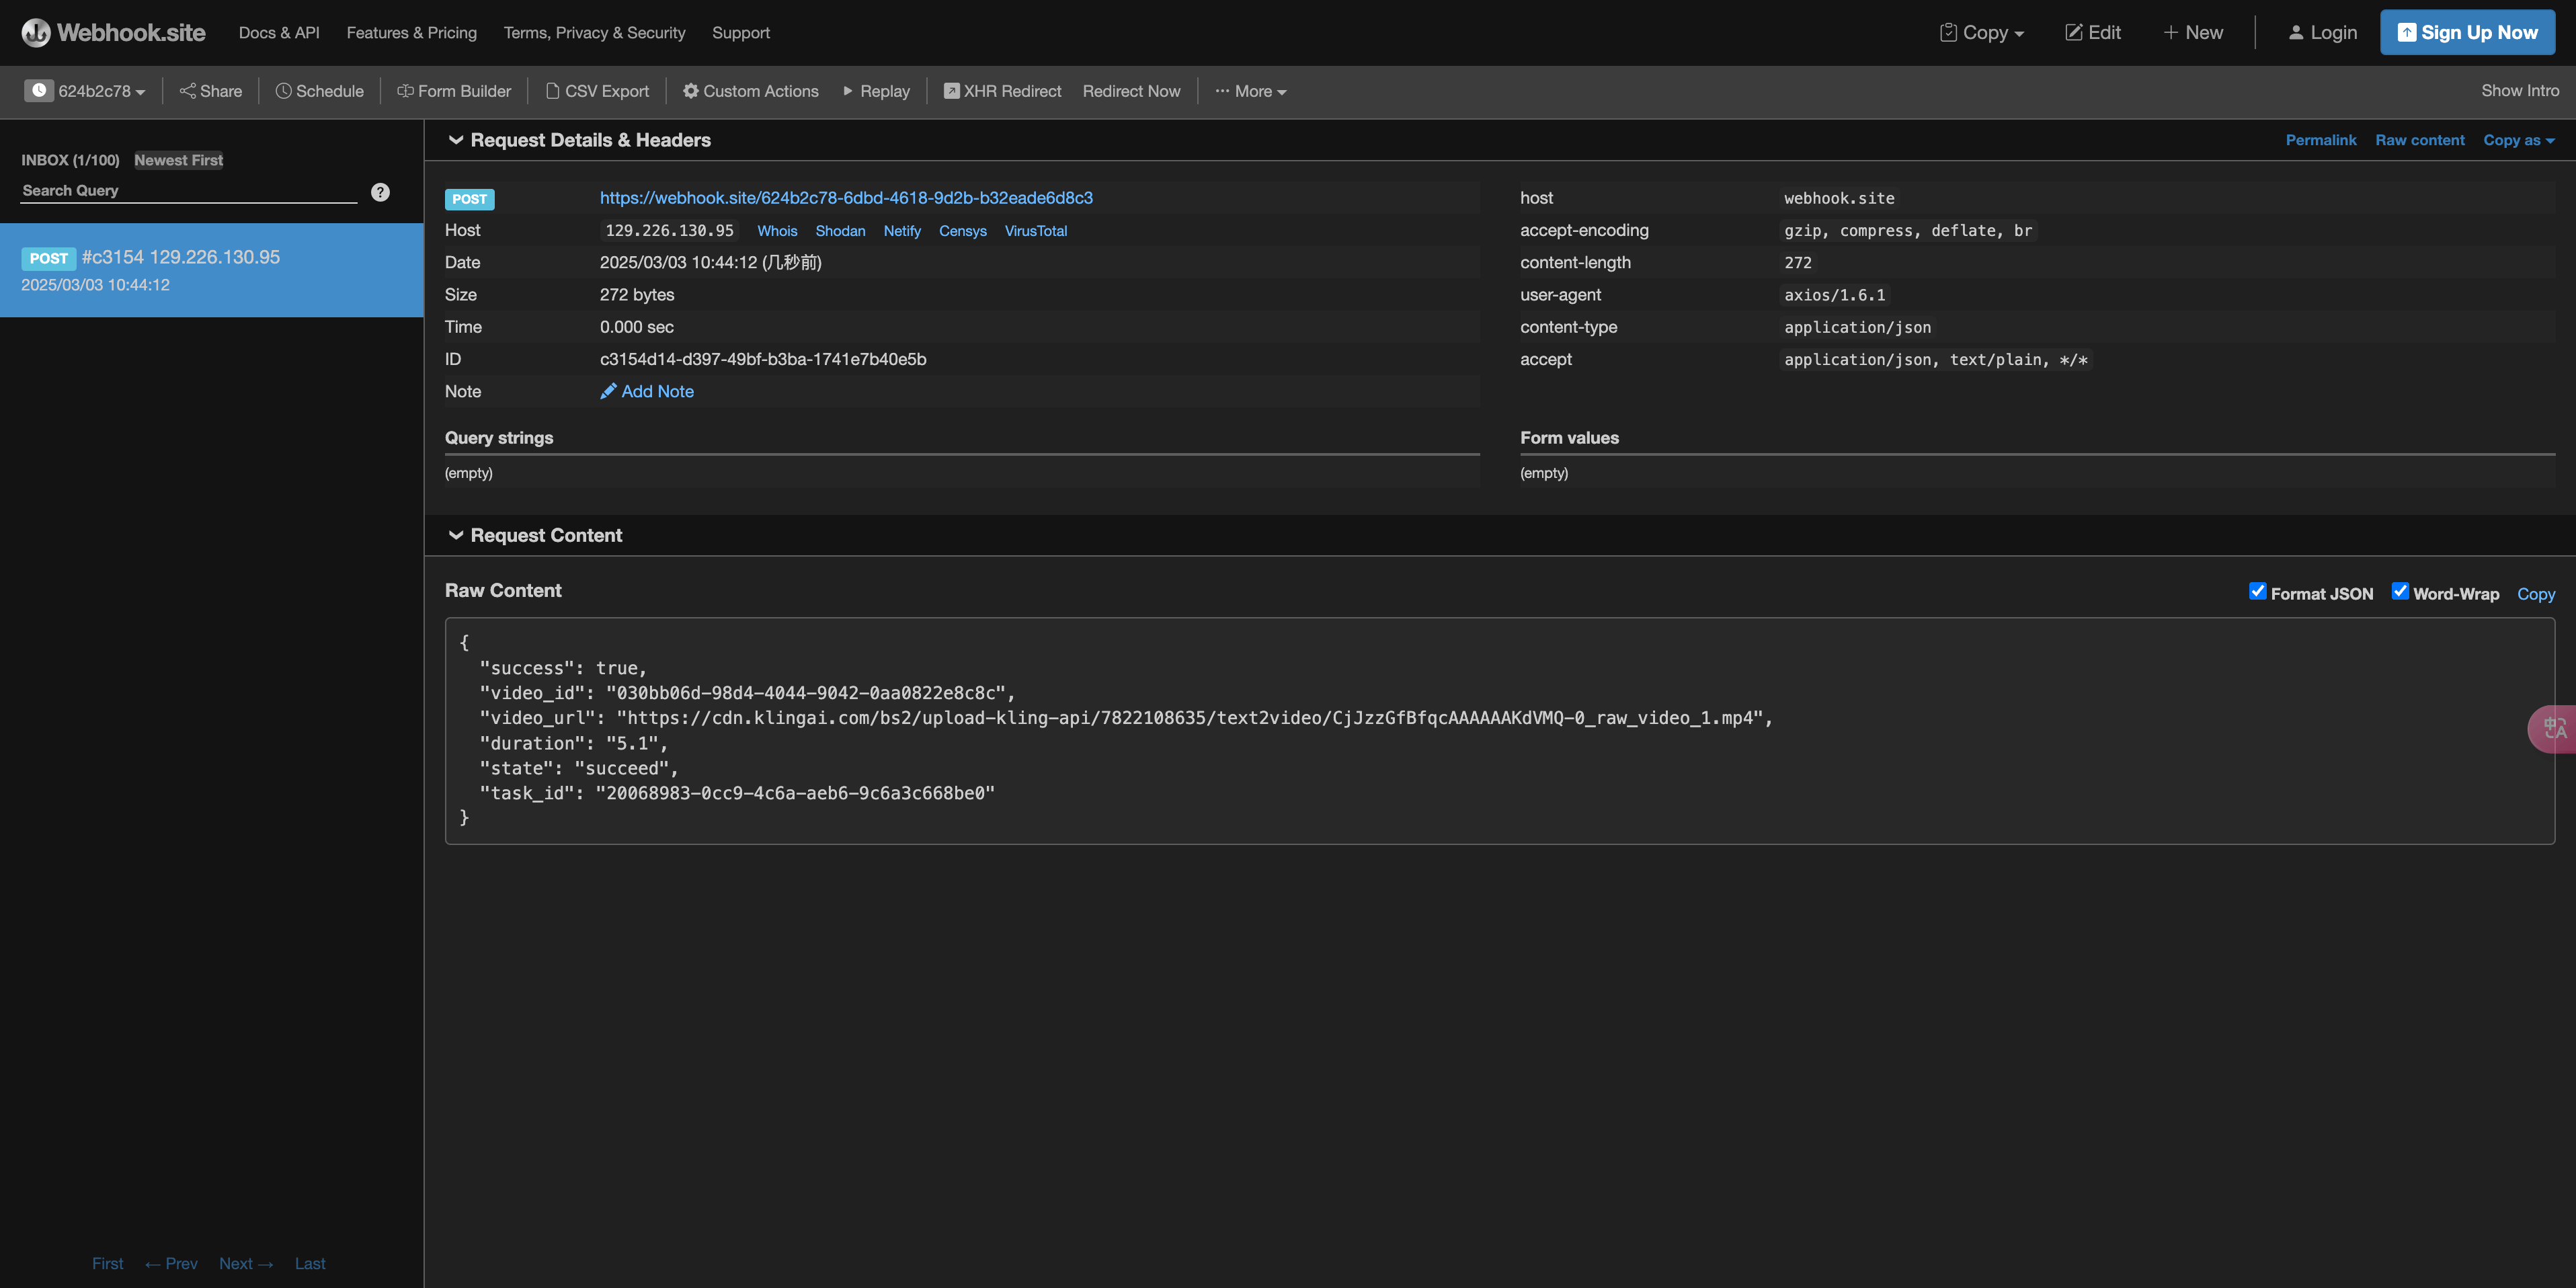 The content is as follows:
task_id field, and the other fields are similar to those mentioned above, allowing the task to be associated through this field.
Error Handling
When calling the API, if an error occurs, the API will return the corresponding error code and message. For example:400 token_mismatched: Bad request, possibly due to missing or invalid parameters.400 api_not_implemented: Bad request, possibly due to missing or invalid parameters.401 invalid_token: Unauthorized, invalid or missing authorization token.429 too_many_requests: Too many requests, you have exceeded the rate limit.500 api_error: Internal server error, something went wrong on the server.