> ## Documentation Index
> Fetch the complete documentation index at: https://docs.acedata.cloud/llms.txt
> Use this file to discover all available pages before exploring further.
# hCaptcha Protocol Recognition API Integration Instructions
> hCaptcha verification code recognition service integration guide - Ace Data Cloud
This article will introduce a method for integrating the hCaptcha protocol recognition API, which allows users to bypass the identification and clicking of hCaptcha verification images, and instead achieve automatic decoding in the background by simply submitting the Website Key.
## Application Process
To use the hCaptcha protocol recognition API, first go to the [Ace Data Cloud Console](https://platform.acedata.cloud/console/applications) to obtain your API Token for future use.
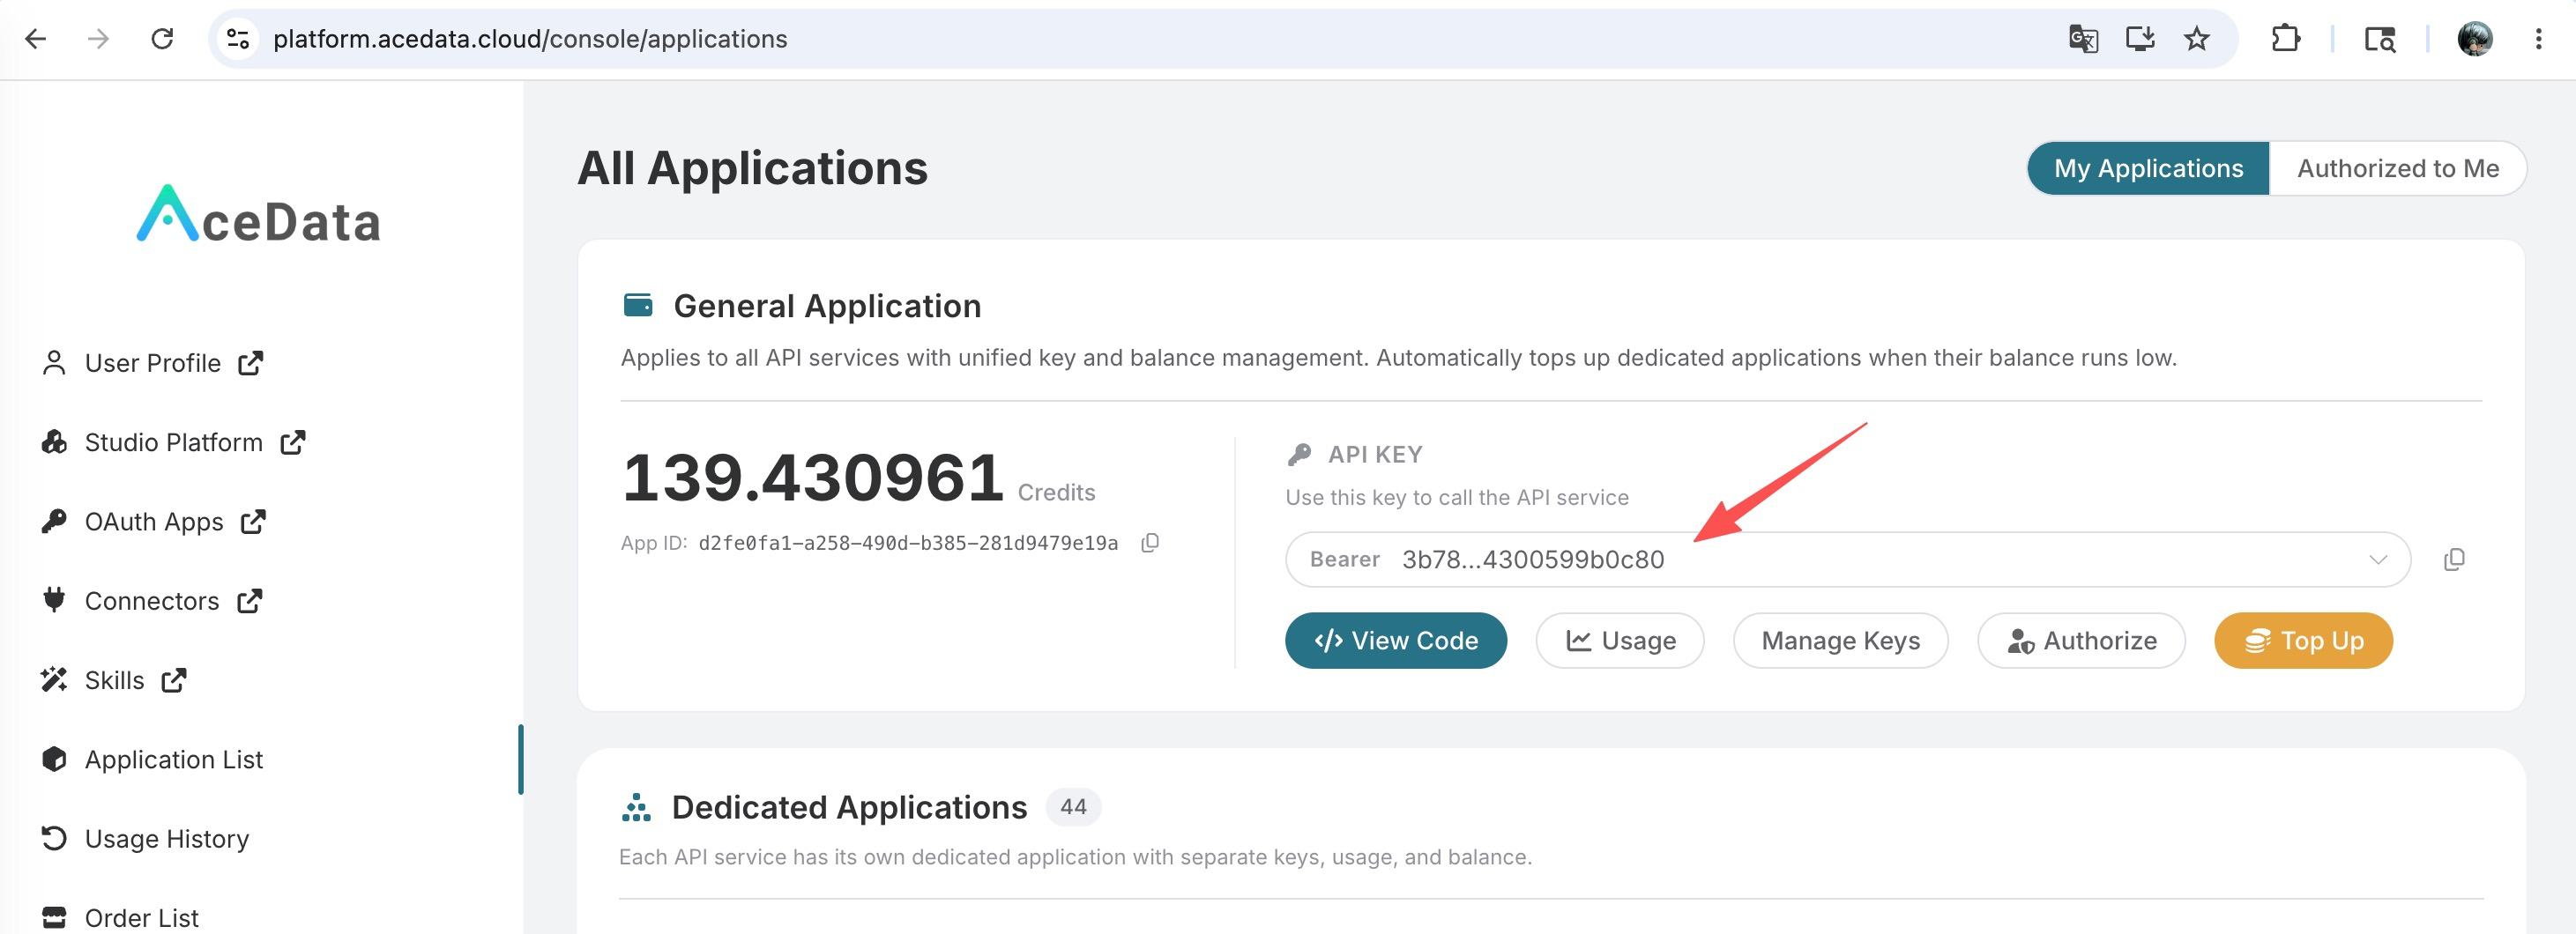
If you are not logged in or registered, you will be automatically redirected to the login page inviting you to register and log in, after which you will be automatically returned to the current page.
**One API Token can call all services on the platform, without the need to apply separately for each service.** The first application will grant a free quota for a trial experience; when the quota is insufficient, you can recharge the general balance in the [console](https://platform.acedata.cloud/console/coin).
> 📘 Complete Documentation: [hCaptcha Protocol Recognition API →](https://platform.acedata.cloud/documents/captcha-token-hcaptcha)
## Basic Usage
First, understand the basic usage method, which is to input the URL of the website that needs to process the hCaptcha verification code to obtain the processed result. You first need to simply pass a `website_url` field. Our example website is: `https://accounts.hcaptcha.com/demo`, and we need to obtain the `website_key` from the `website_url` page. First, open this webpage, press F12 to enter the console, and then perform a global search for `hcaptcha-demo` on the Element page. We can obtain the following result:
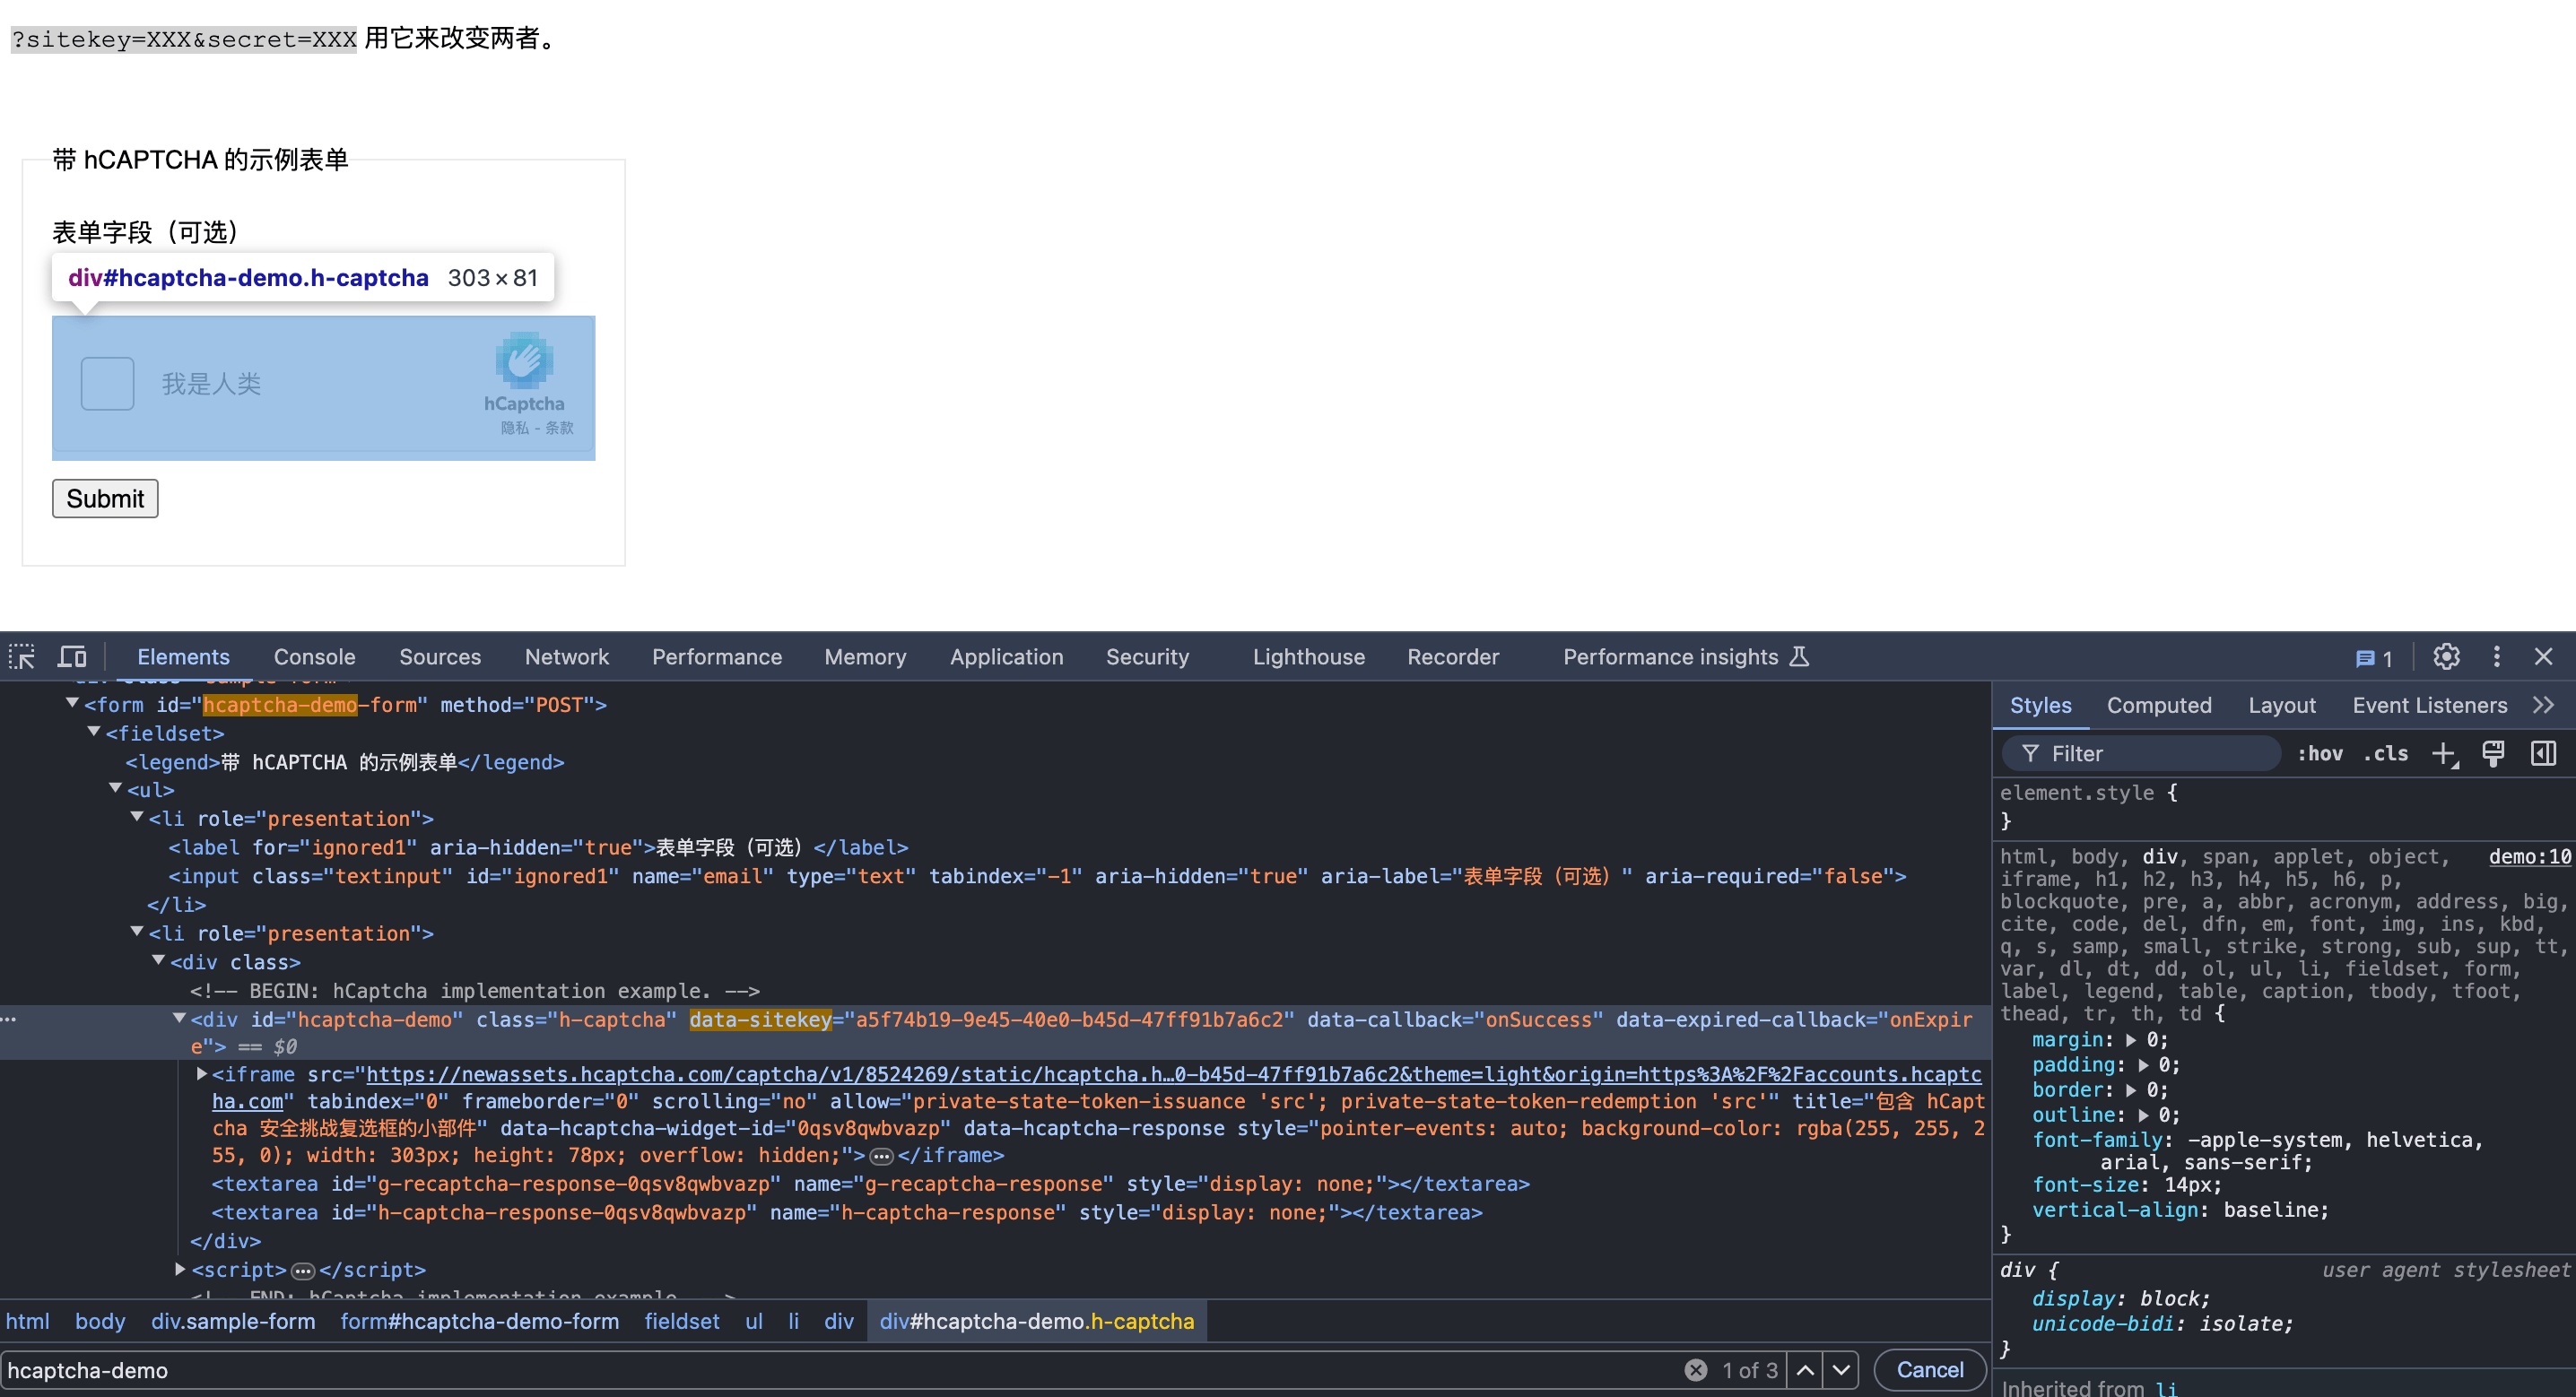
The string corresponding to `data-sitekey` is the value of the `website_key`. Below are the specific parameter results:
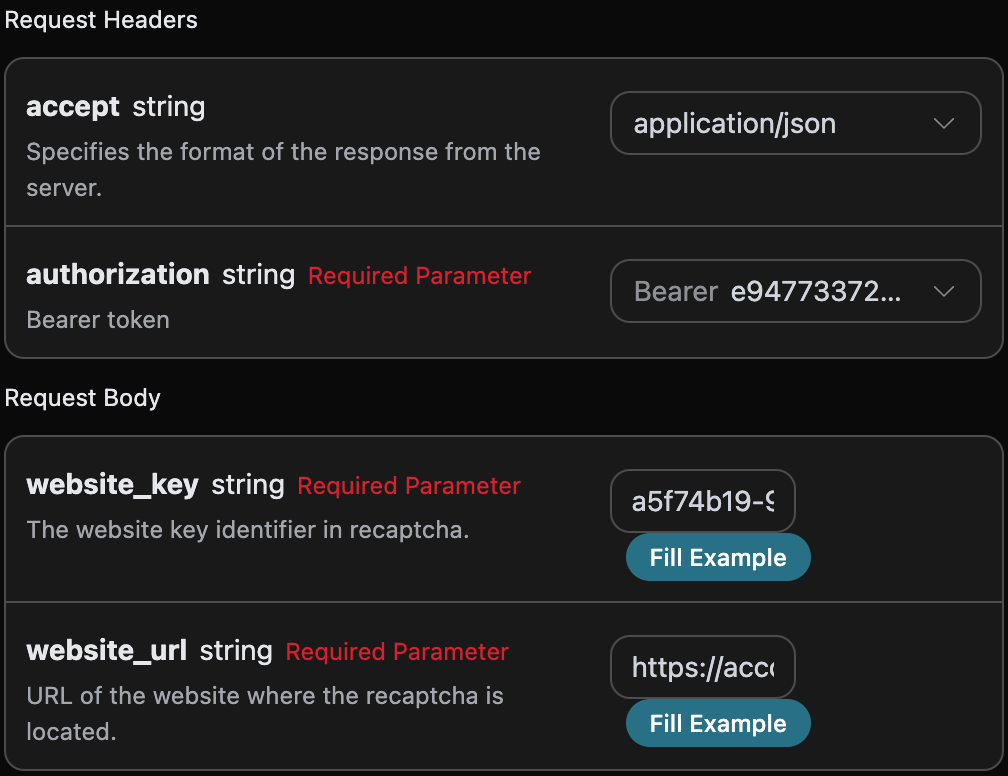
Here we can see that we have set the Request Headers, including:
* `accept`: the format of the response result you want to receive, filled in as `application/json`, which means JSON format.
* `authorization`: the key for calling the API, which can be directly selected after application.
Additionally, the Request Body is set, including:
* `website_url`: the URL of the website that needs to process the verification code.
* `website_key`: the website key identifier in hCaptcha.
After selection, you can find that the corresponding code is also generated on the right side, as shown in the figure:
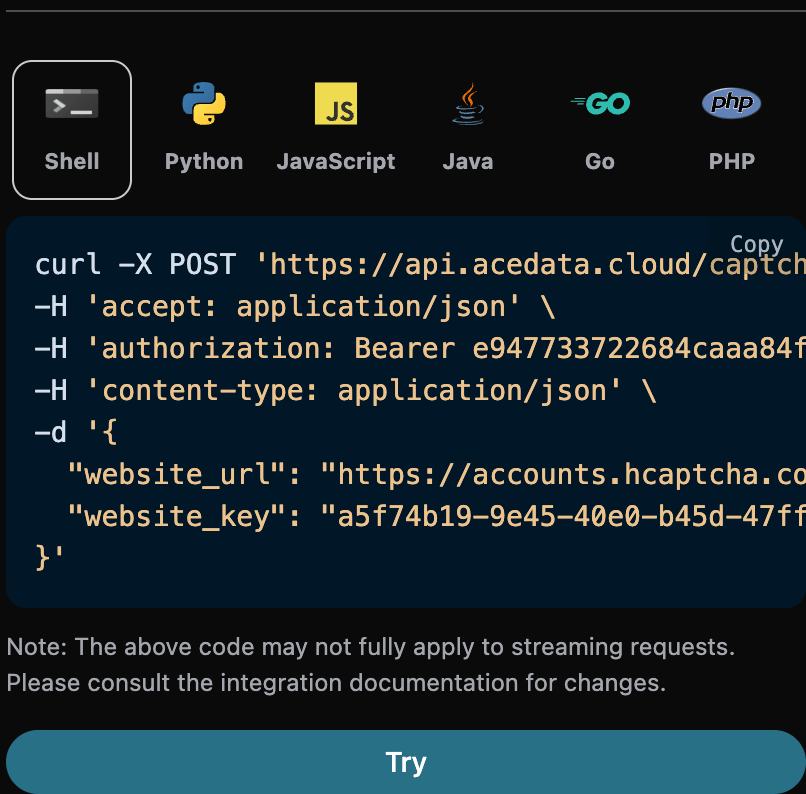
Click the "Try" button to conduct a test, as shown in the above figure, where we obtained the following result:
```json theme={null}
{
"token": "P1_eyJ0eXAiOiJKV1QiLCJhbGciOiJIUzI1NiJ9.hadwYXNza2V5xQda4nQzFgUbYJqILiiwbvyhjocSilg8RjFHvIHmCzmqUNZa9hesIWEVRx5KIbMVeAQzSTWCwXmiQrPZuIEmZz-ZPL6DPNmB3ZXtJNsVYRLdRyvWPTB7EYskJG85yDVor2TcgQFNqAahhKT3WXjtk3S54ZBhv7QvaImUmos8MWgUOvUZHsvUtojN-izWIrBkD1if_71quOHvcvEVTLcSLx9dOgzpNAJ8_6BmJEsGlPbMGnSKrS1QfpPyzvgrnpjjIY_6TMYwJrR0EwJgCdp_lfc4mkxl0NJsZt8D_q7jcv3v6jt1CZ2qbqF5_-i4y0MYnQMCm1T62xBPdiEyst_FtGuWxJllkrrmWN0edyWcWeasLcCS6qpRry0H7RU7DYQnML6dmQoZg15NT0tFrAYeLK7EwvJxzcFbvUQ-Tc5QVk7tzvKpDtUVfQeZmRRgxWbCFf6bAT1z0uUwdma1O1lcTkSZCC5cVTaprkkKE04Ov4aCIKg2N7WGj4r0AOykisAISX5oidF3gejDTJy9vU1hgaCYFOimnwRKyqRsJdznptzhzDOQuICuAHYT3is1sY26ltJGOZTdDKkt2i2owCoAylgLbBP8VjTOGrsM12IH3Xsy076O40RCG6zThWN5TFKSpl7PNA6l2KoW-P3_K9WORjx2DSvKTAwqcouSU-0Rc_8Hlq9cIuS1iDhiNfJnJ_zNy_2gXSR2j7NP7m_lsfwELKypKm6pPzIhOuz5RwPotfPQfXOMdF3Xy98iQiihZmuHENvLAhjV_W7NL9TK3THPwDTFriS8ghIncl02v-fVARXDiuFTvjjlegL7xbHgIrOhLpunsxLiwdImUWatEI9jqaf84X4BtoS0TGYo4pHkpIG10dhoz3vooeSToAws6tz7ZWSHm6naksZ41X_WIxd7N8P9yzxrbLgVv-nHia5qHQLDmiZf3alITKhtisennw8NpespaQIVZzw_B16bdUNKqHCCTLdFbr16-3KpRoHzOOU2kBhV-gDN0NiA3ecqIMnyMdnpKlUpnjJ5sMA3e0pKEX_Vbu8DE8zfkcwLIwCIb2BLrKEHnCvv4JX8TfBktzMc5oTtZyEu-E_6ew0mSm_nhVsGtmLXSsB81FP9VGGRd50buIXRNW4GFp3XdTmYyuN32kc-AHJ5kKDj2HGraHxKco0McT7nV2bgx97k-C7hgxL2x5t3lC97edphh2kt2-gXuTxxfB7K-ZG6w5d1MnRte4ZG7TxvPFFi5693IFRFbvcr-U3WyGZJmGGdfV55PnoIU9Qn-WDtBU4EXyvd_KTt-asHtI6VQiVSNzacemTfsu9WBF33f2gafDY4qqhyXDPNsu6BZCGMSBhxDPURY74OBr4mYOdhjELY07nSkr9RQtQwiiSa8B8XFlezCPafjgdbmmNzG3PXa3n23sSwVnJHpHhq79eTP_KeeCiqlCvNsHLEfiH5HCNRGp7v5b342wBk__BWFimJMvohz0rucTVYgVFBdTOomUTuqCPeUgDP3X6BnNqyVDRA-HrdRl-RkU6mnw-3-IwyMZQ-fEnFMzbGp3zaoY7Do2jKvKKILoq6Q8zlDYkrLwuXjDP-nernI2hxP9wVOUVmtq5Rs19RLUI4MNWZAqwG-wGnaoB756d8nfmh5XhFzvArE5bpL50FY1yJqv7nbPW7JNnkfZG80yVRrIZO_F9NEb3n4eiIzg9Gu9fv8ncyChiCCp-swK5B7_w-XsAlco98bO-YK-fFMJOhyt0PU8Zc-hYoCa6cLVTvhdPzIUA0CQOemg4Pz6PX6SVwLYSlOXYkzbrgBlyH5YBS3oaRCeavVLrJsKt0_KwHwgBa1mdP5mlYUpBDbKR4PKwknU7y111JH0B4fO39dOVA-zecvDG0bnuy98Jym4KUchZr1tXabMcM20mg1UvcxMfnKOx0ojBcVwYA7kPQK3EzMnwX9NbAzYP6IlMgjFK9ZM7HCXxN6J1_6kw10RT4O58-Pbh3cMSrZDfM-GuG7p7XrVpJrX8TD195DCJqx-DmVv3Bs3CiuCPTvGrSZ58KE4hQagidGreUD2WXxLBFfTv1RgM3eXMtROs7hddyBajIu401lxucNbpRB7lYV7pJwxG7LQoSZ2G2LzG8eFPVPIkDNVOa8nGzh-sWaF7kc7bVv-P4FXbLX0WCjvQRES2MCbXPyJ-OpZZXZcJy7SOsGY3jZbTkGoez19cRQLiFO35gA5l9FBptDKW-_yGemt5XeKsR_FwGPN9C-0k1E-28oB4iKo-h1zb2kJpilhnmG36Z59F5T6W77M7OD_N6VHRWuPClLElO09OrPLHbJmxq9JvMWjTg5JjEaqyTLyLXWgw0N3kZMCqJJeqNj5w5I7dpuJ6ScfXKVaT96v2UESebdbMFT7vkZAkFF8LIowkN56pNwXLHkB2KyIWR2WQL-335BEpQ0AVB6RX4kdociIhtvAdsIE6pvFIwkzyO0OvIHxzOwPxZKdmDmBVMu7YxJStrhY-XWCu4kO5gDIJ0iedPWKNleHDOZuZqGKhzaGFyZF9pZM4xrUyBomtyqDE1ZmUwNDhkonBkAA.dVWyVc6N3lx2ZJQ7NJ9aEsWA-KAIuQ4PMSKVGQuWyCA"
}
```
We can see that we have obtained the verification result for processing the hCaptcha verification code, which we can use for POST or simulate submission to the target website, for one-time use, valid for 120 seconds, and it is recommended to use it within 60 seconds. Next, a CURL version will be provided to submit the processed token to the target website to pass the Recaptcha2 verification.
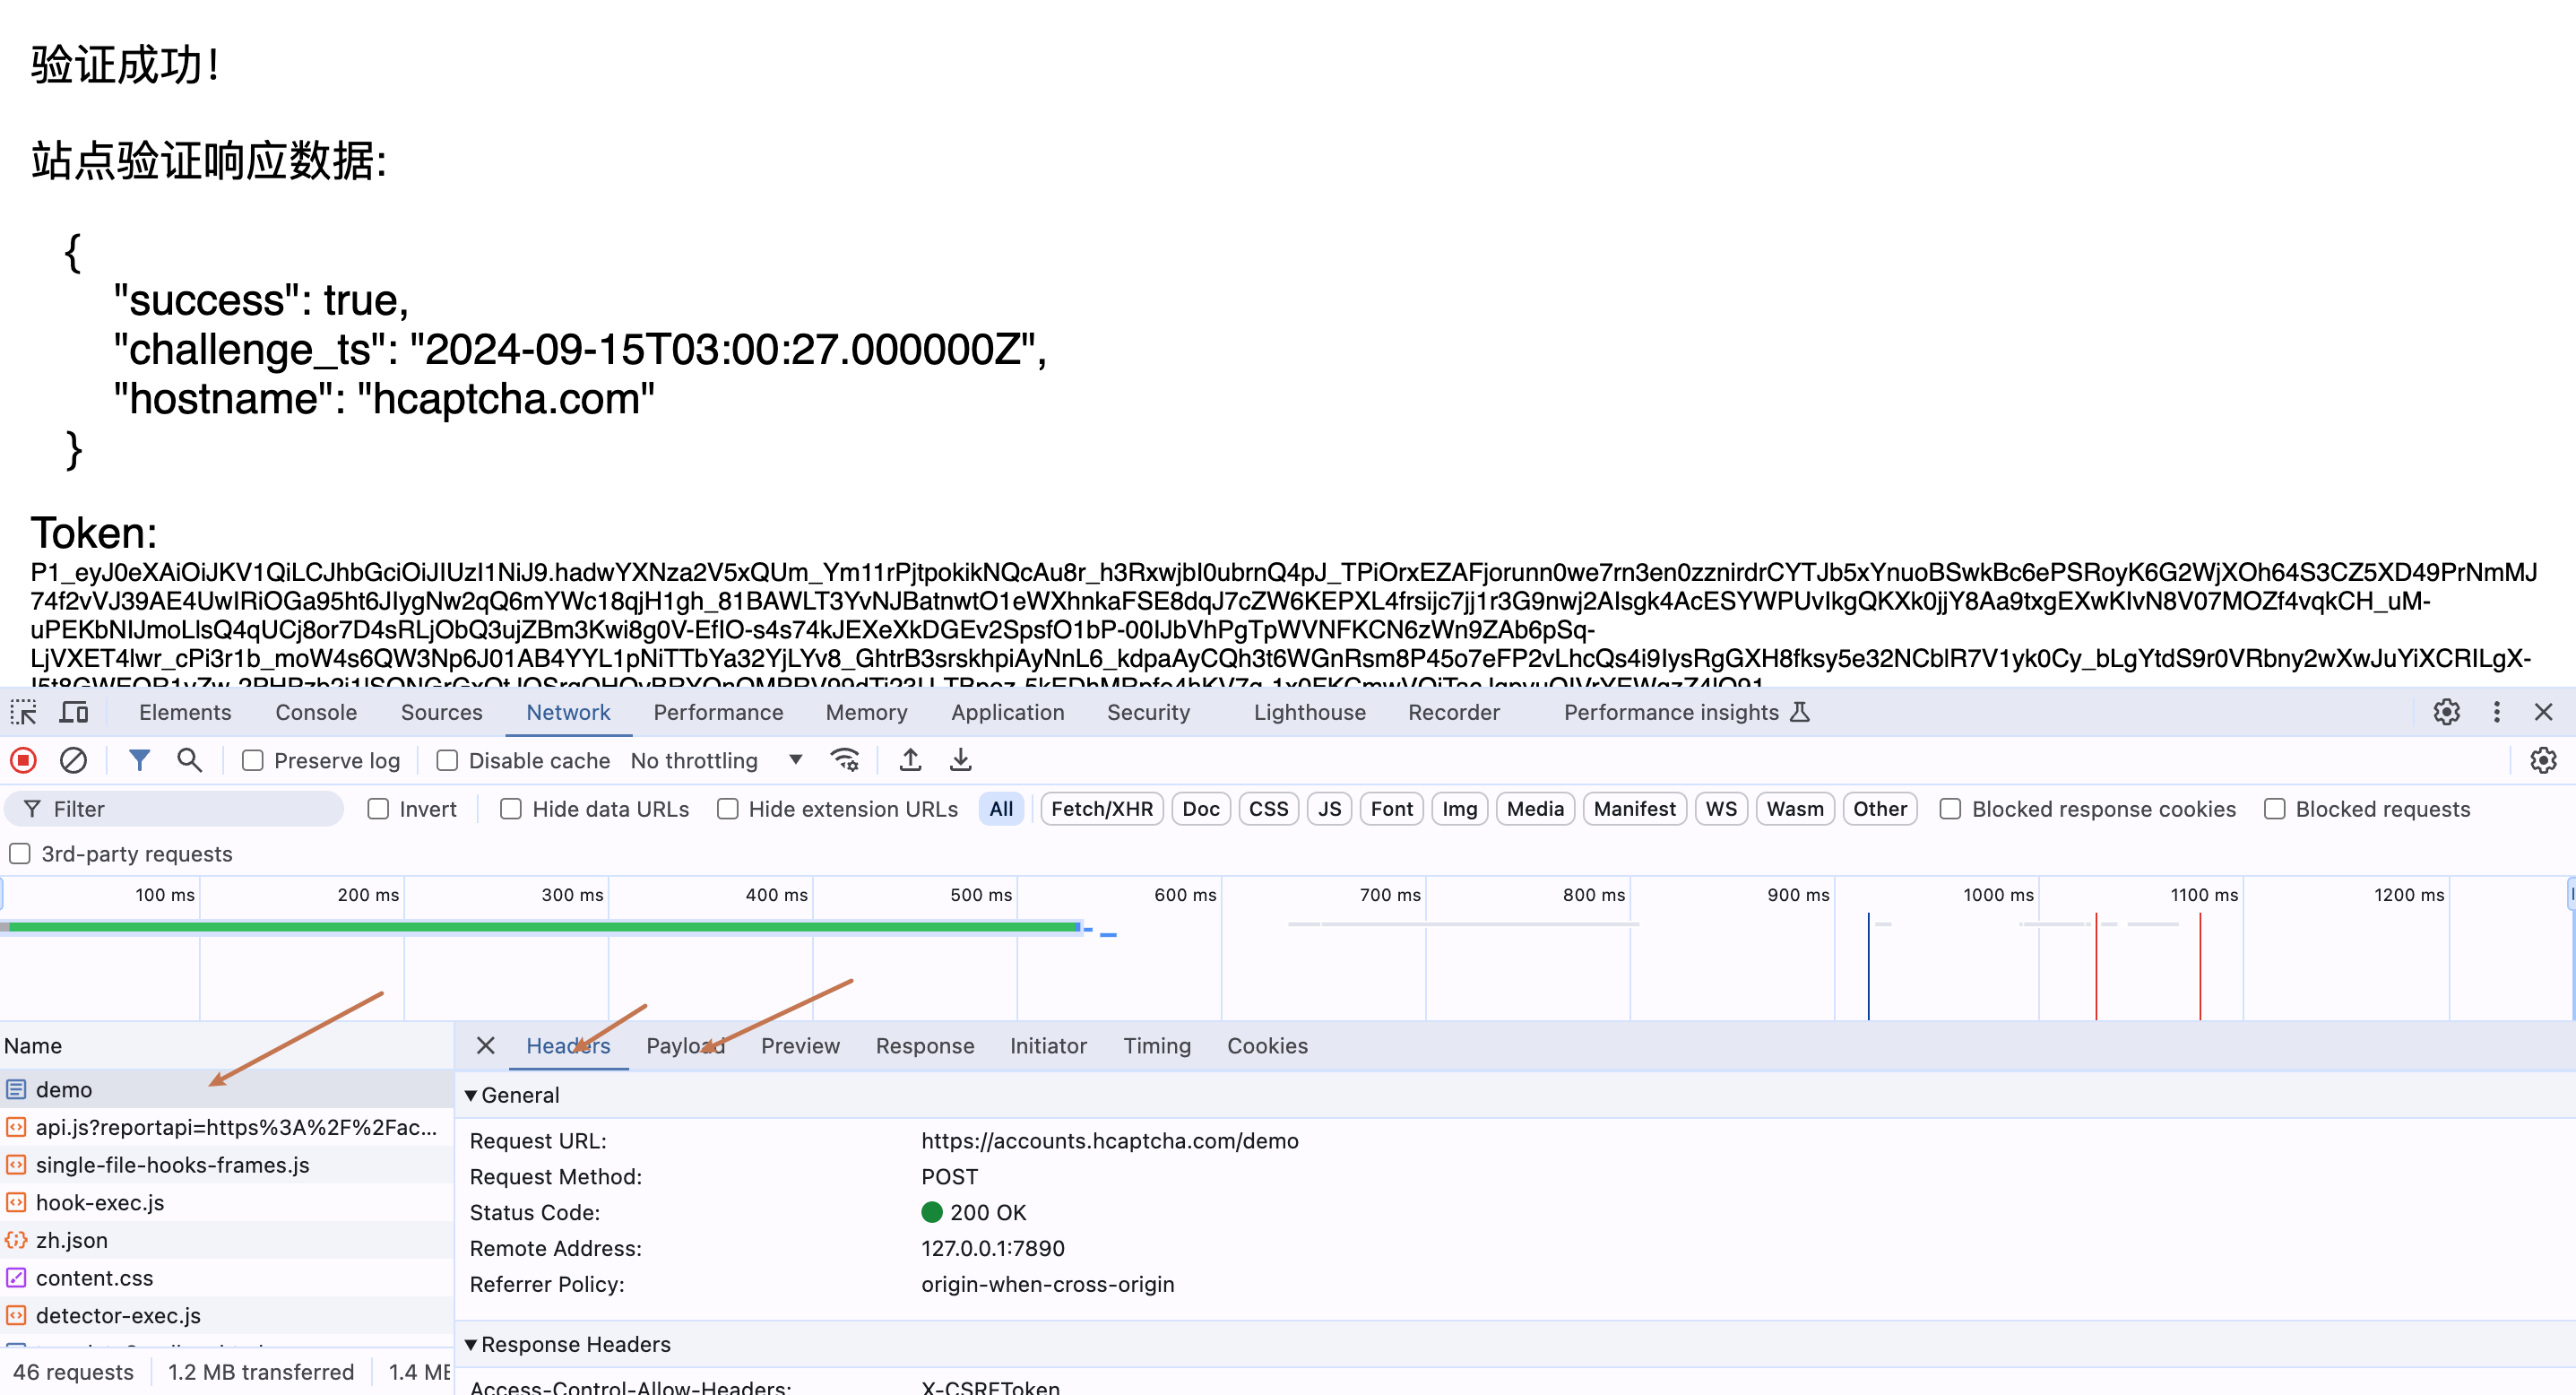
First, we need to understand how the website sends the POST request so that we can pass the generated token into it. We need to open the F12 console and manually go through the verification. Finally, we can see that the website has sent a POST request. We only need to check the construction of this POST request. The specific process is as follows:
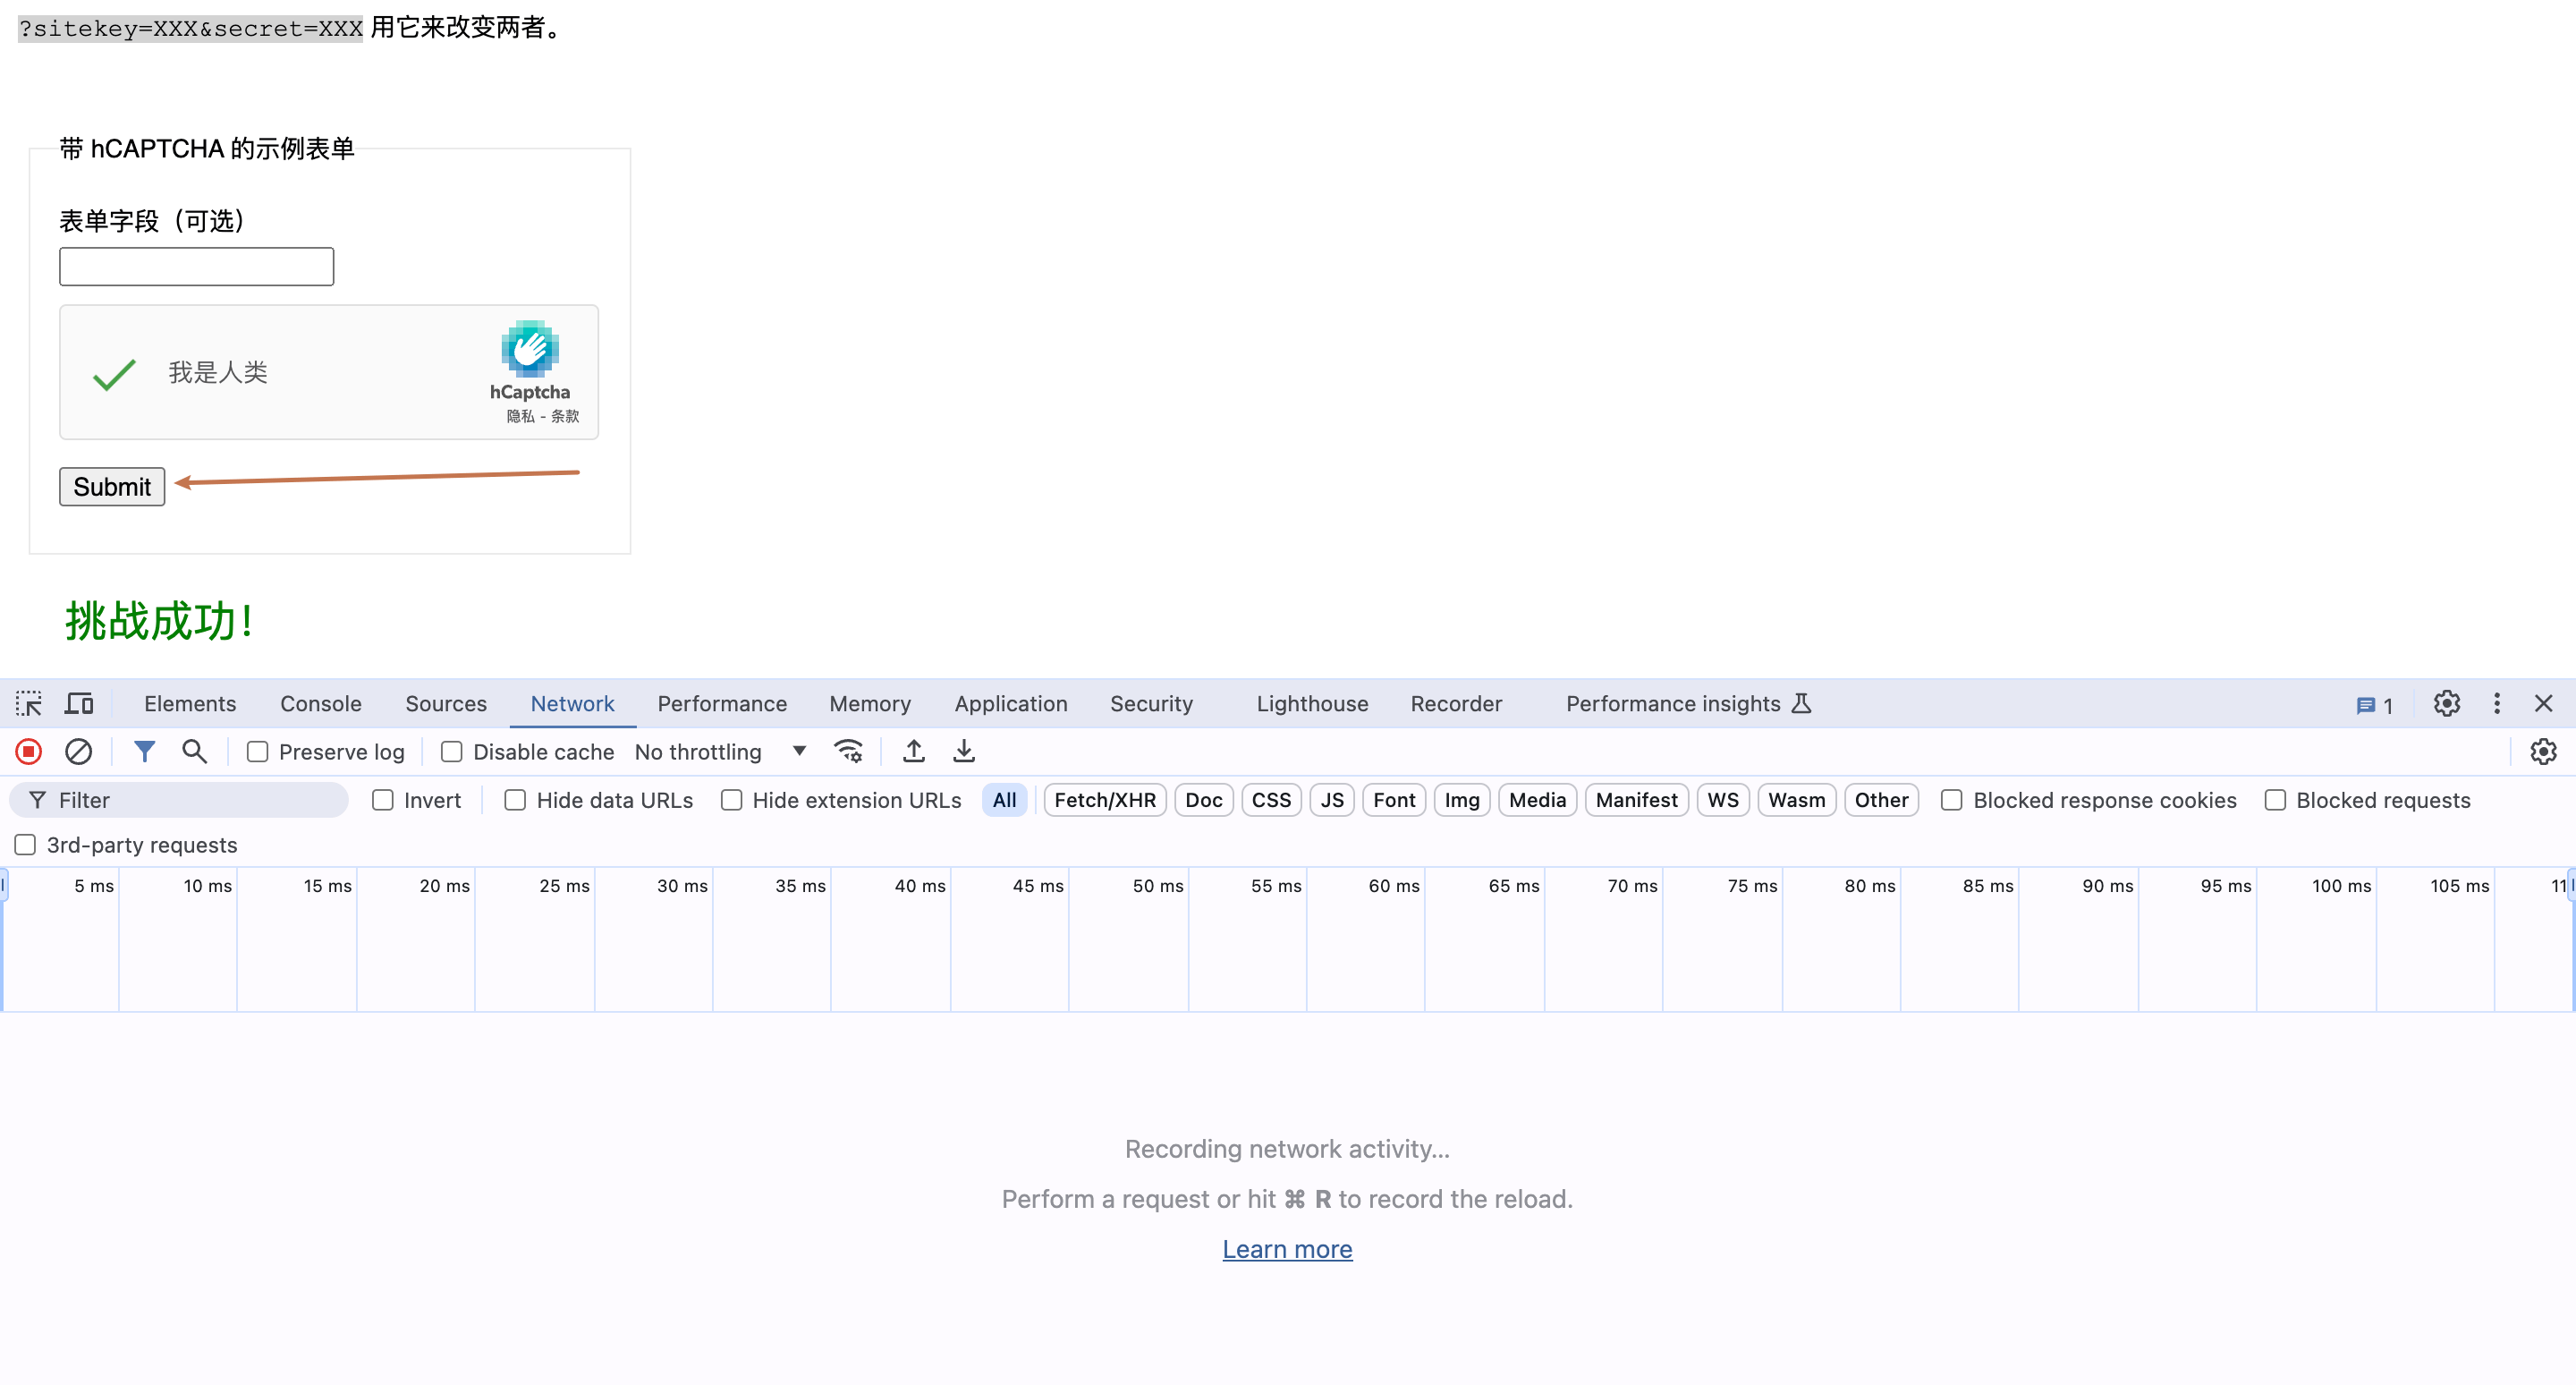
* First, manually go through the verification, as shown in the figure below:
* Then click submit and watch the changes in the console's network, as shown in the figure below:
* Analyze the construction of this submitted POST request, and finally right-click on the request to copy the CURL code, as shown in the figure below:
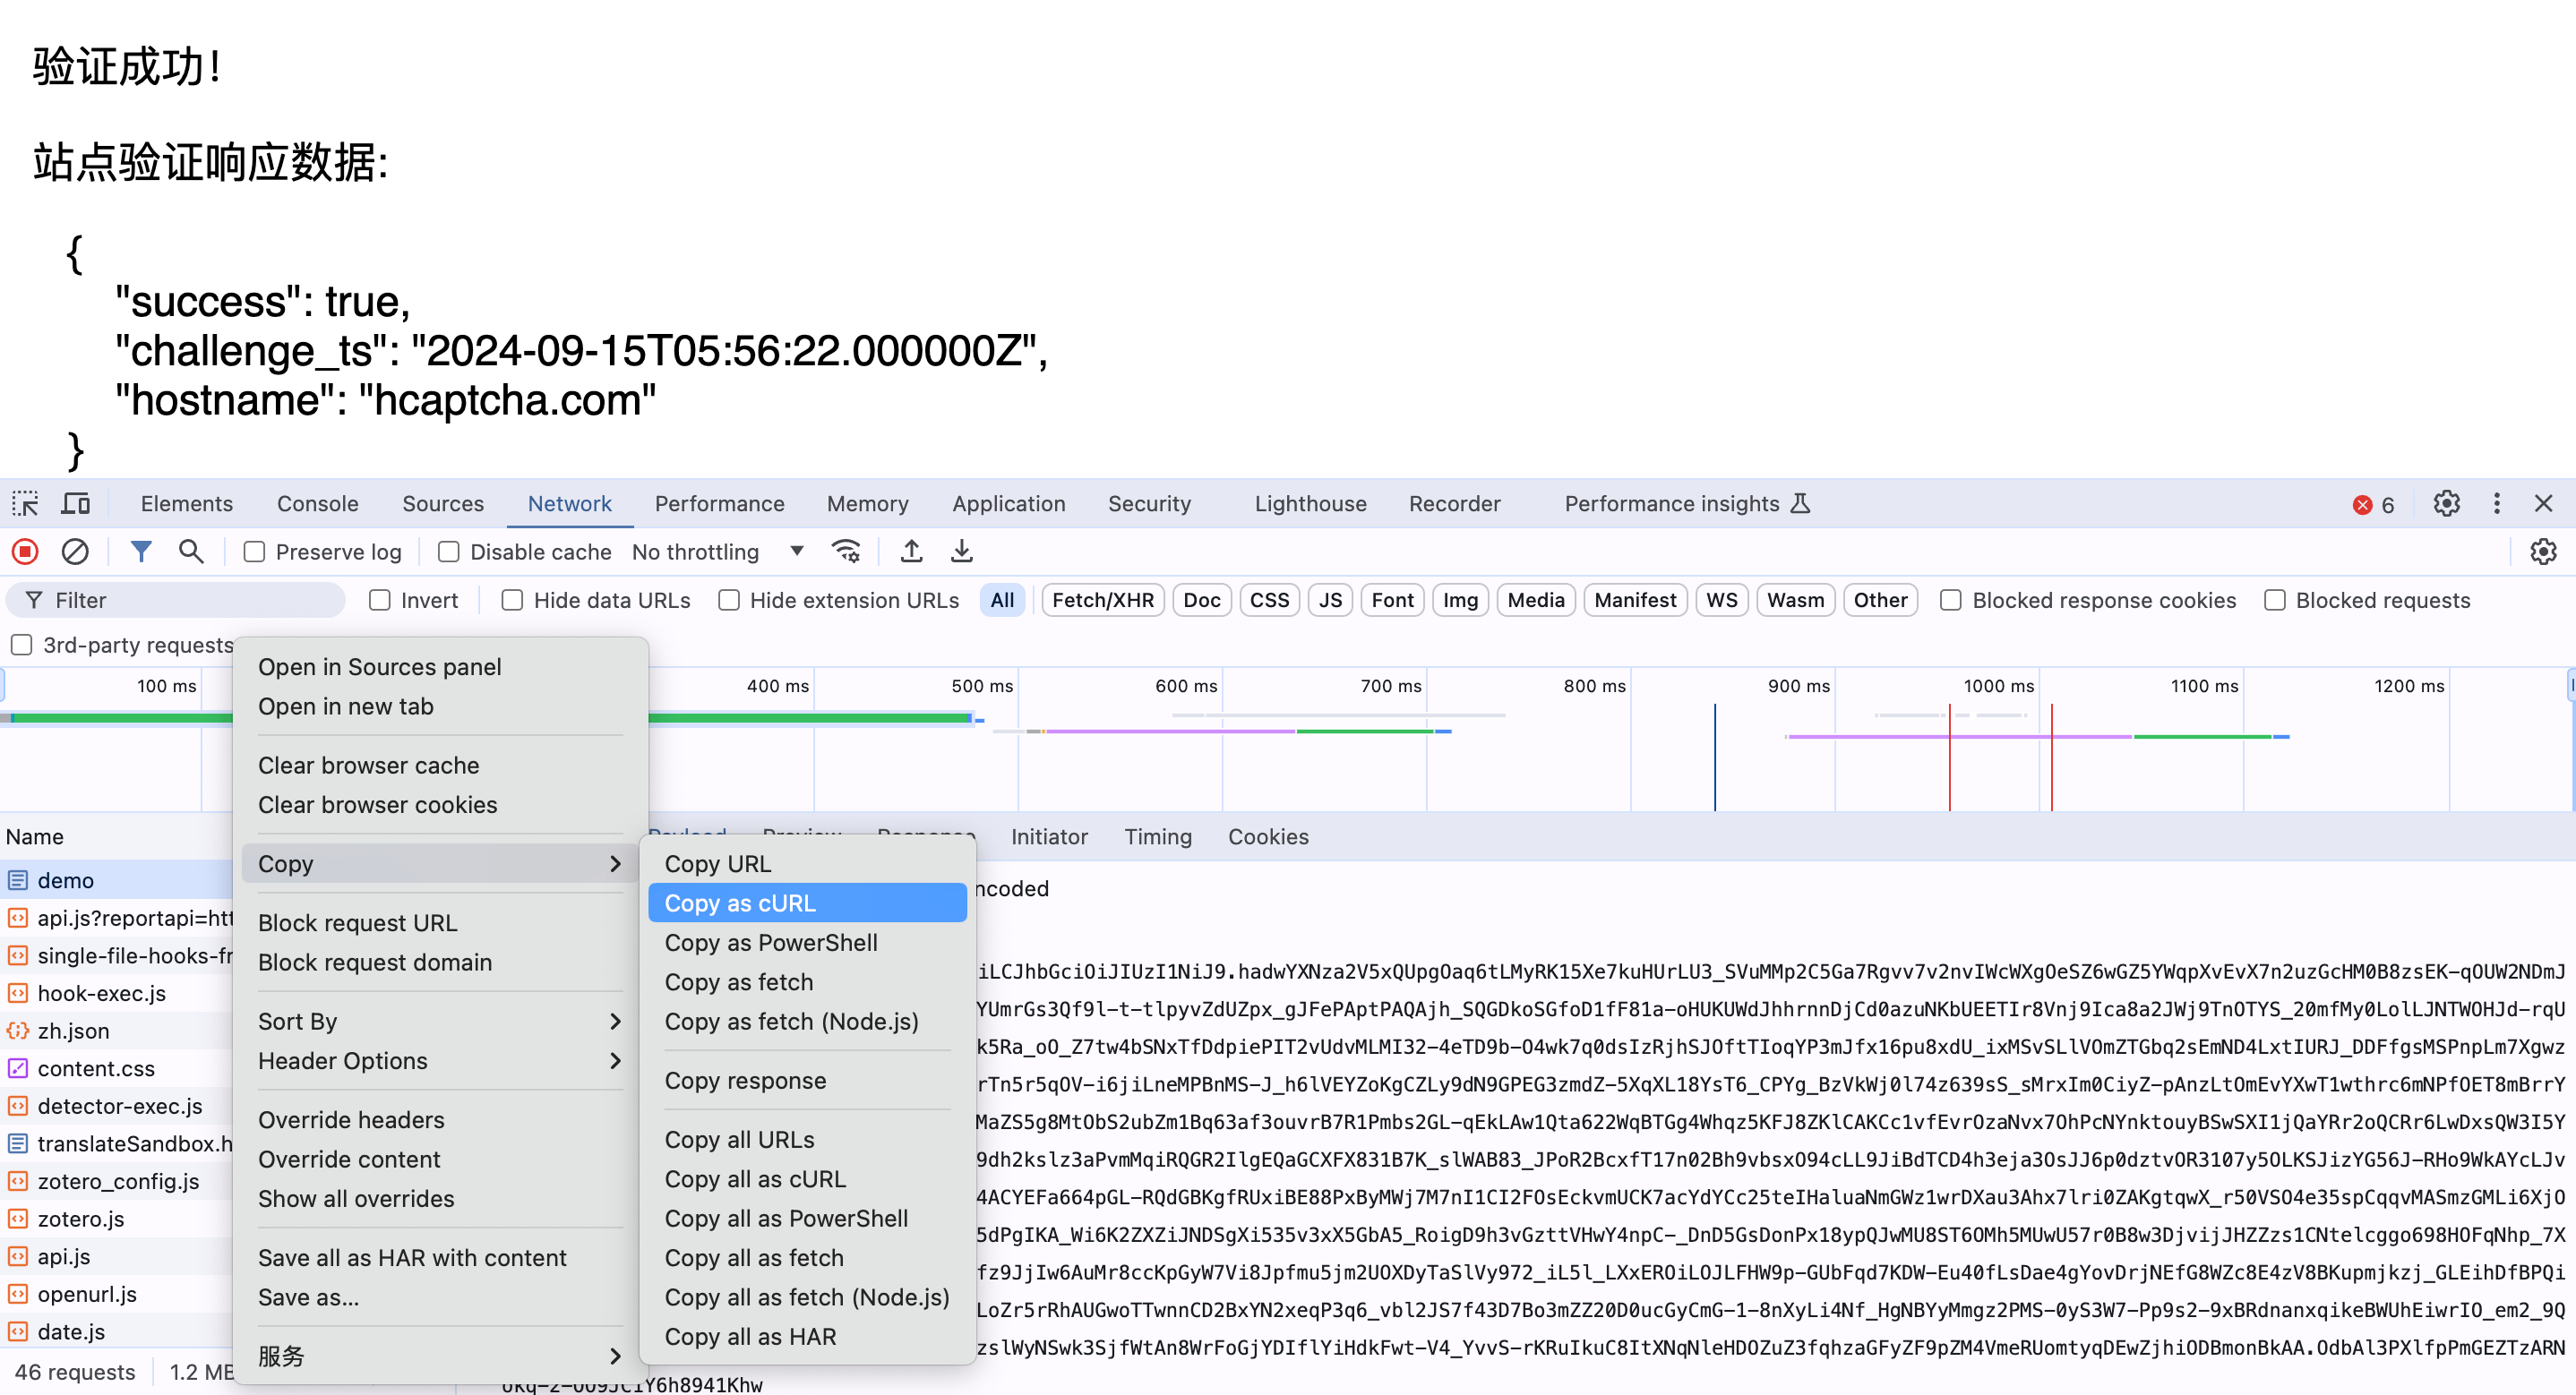
From the above analysis, we can see that the URL of this POST request is: `https://accounts.hcaptcha.com/demo`. We only need to submit the parameters `g-recaptcha-response`, `h-captcha-response`, and `email`, and then we just need to pass the processed token into the data below. The corresponding CURL code for calling the token verification is as follows:
```shell theme={null}
curl 'https://accounts.hcaptcha.com/demo' \
--data-raw 'email=&g-recaptcha-response={token}&h-captcha-response={token}'
```
The corresponding Python code for calling the token verification is as follows:
```python theme={null}
import requests
token = '{token}'
data = {
'email': '',
'g-recaptcha-response': token,
'h-captcha-response': token
}
response = requests.post('https://accounts.hcaptcha.com/demo',
data=data)
if response.status_code == 200:
print(response.text)
```
Then we observe that the console has changed to the following result:
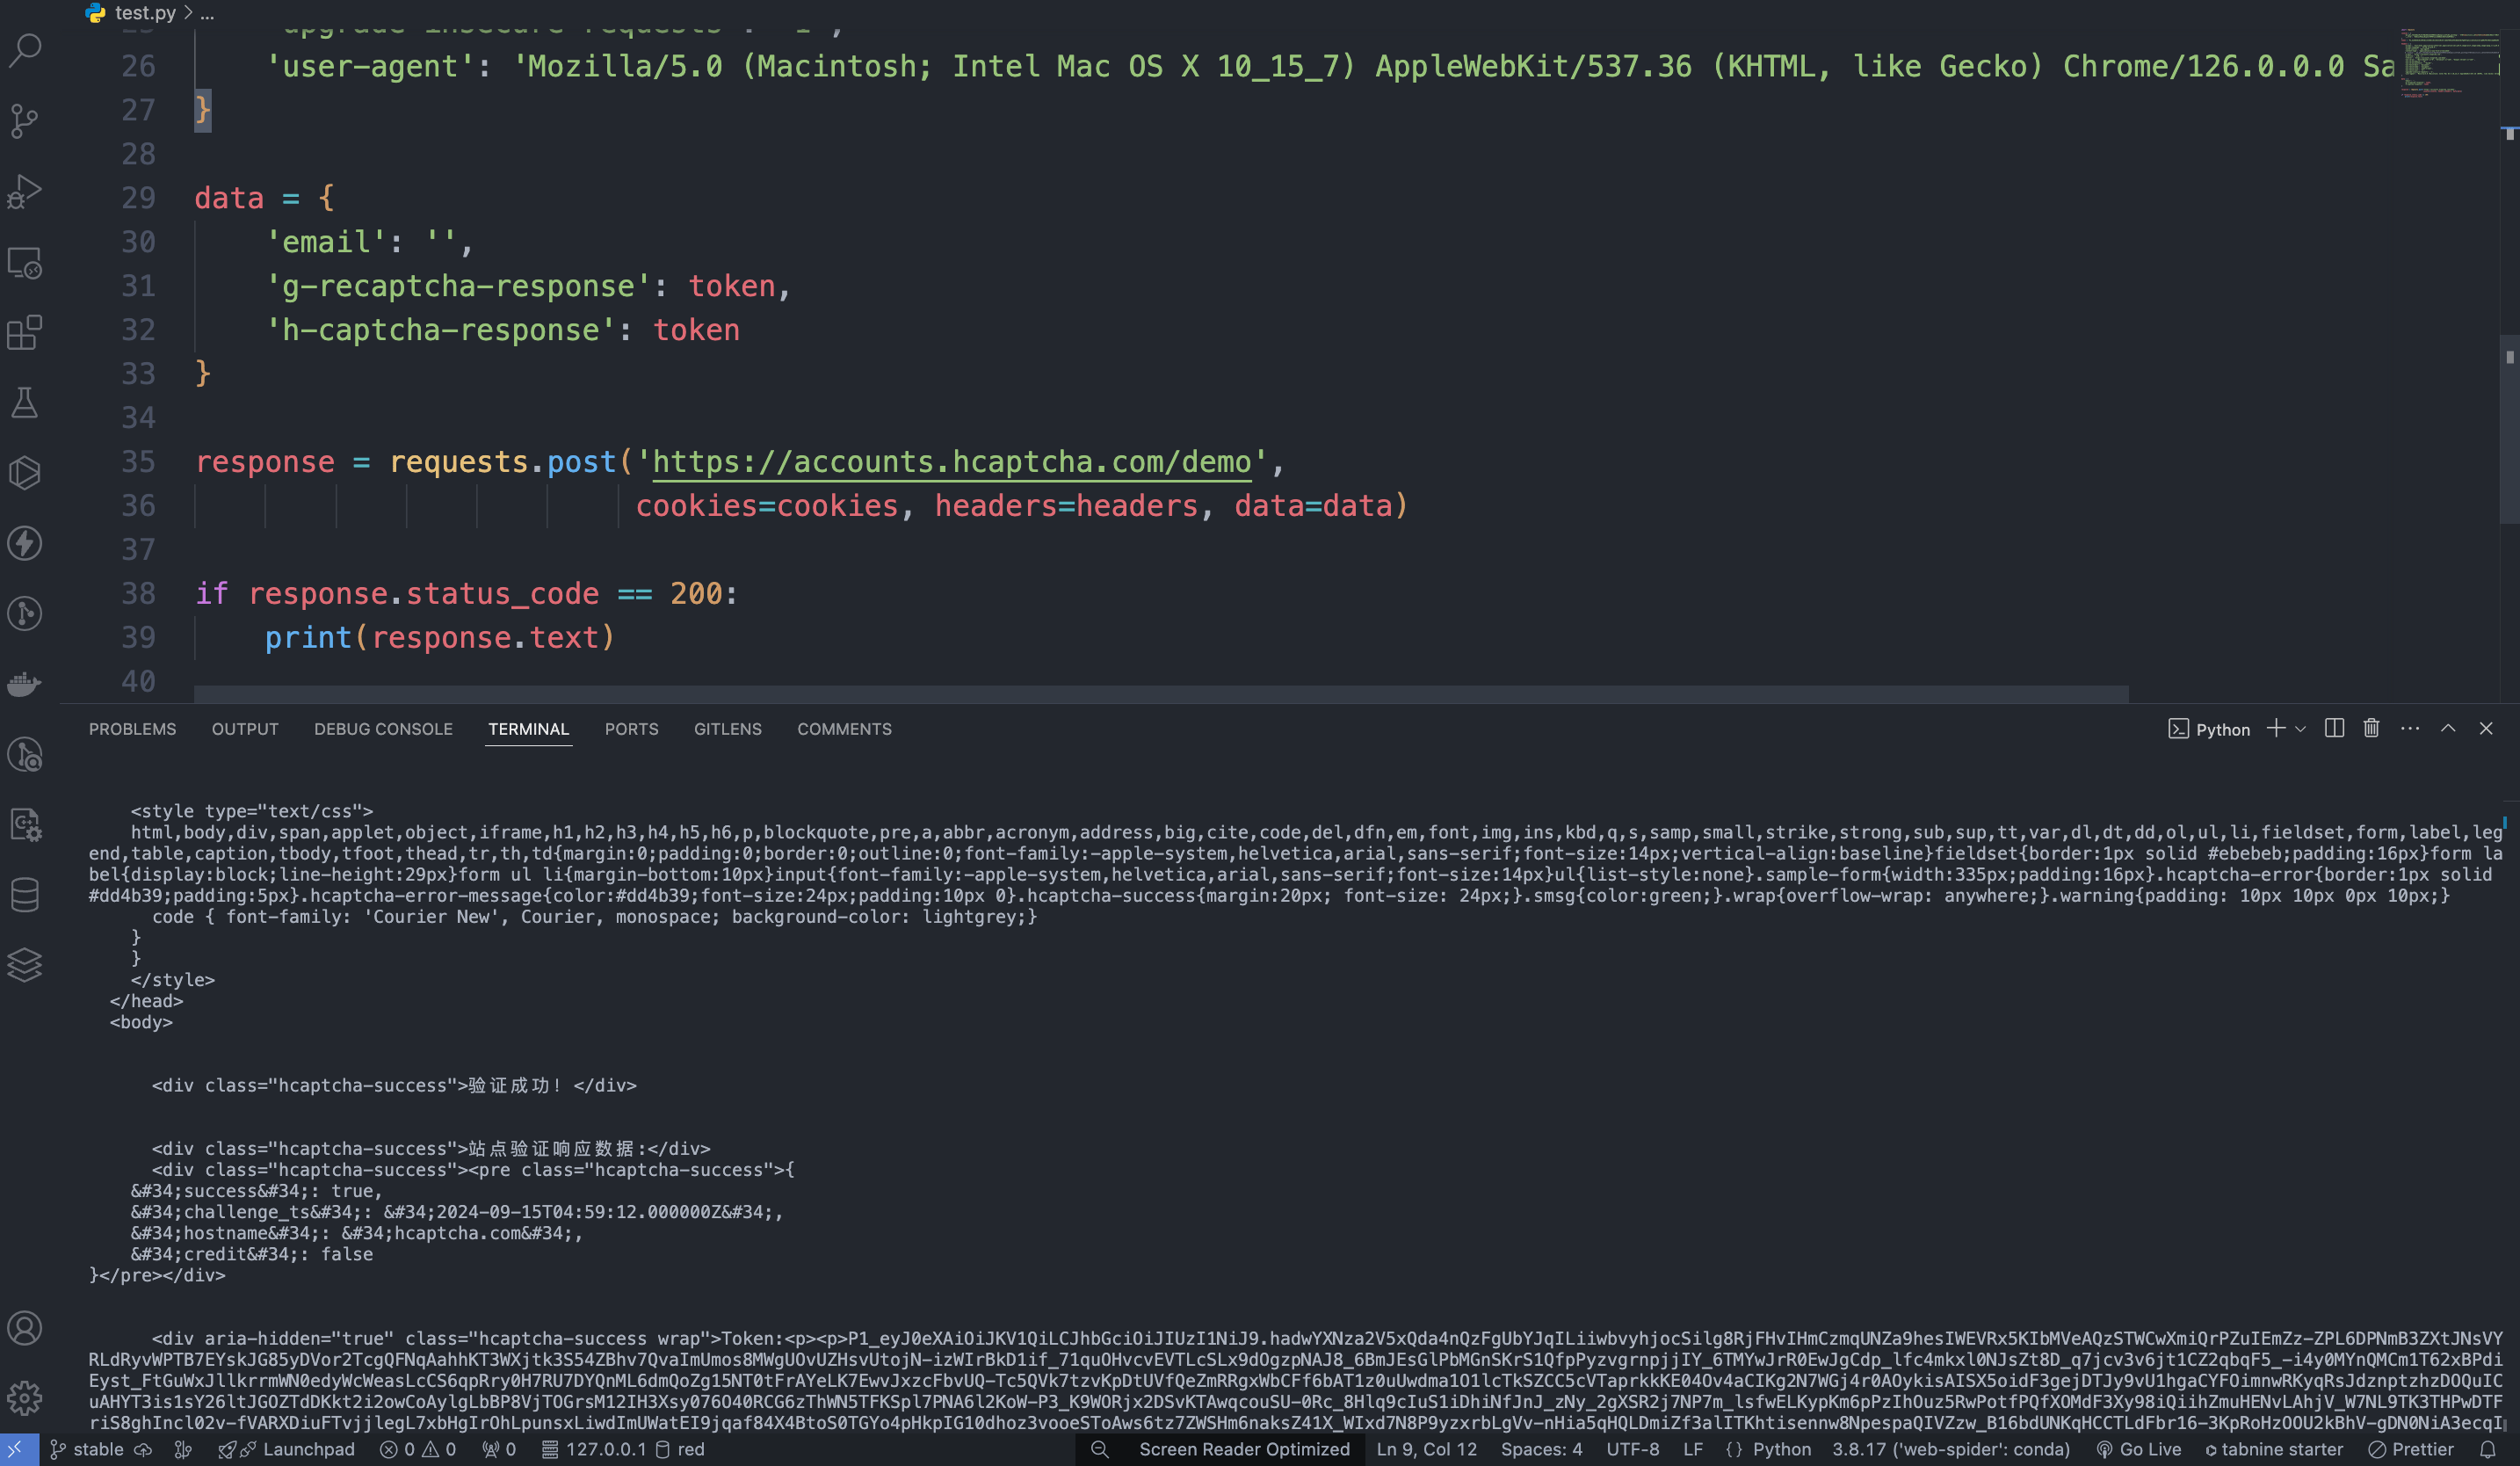
Finally, we have passed the hCaptcha verification.
Additionally, if you want to generate the corresponding integration code, you can directly copy it, for example, the CURL code is as follows:
```shell theme={null}
curl -X POST 'https://api.acedata.cloud/captcha/token/hcaptcha' \
-H 'accept: application/json' \
-H 'authorization: Bearer {token}' \
-H 'content-type: application/json' \
-d '{
"website_key": "a5f74b19-9e45-40e0-b45d-47ff91b7a6c2",
"website_url": "https://accounts.hcaptcha.com/demo"
}'
```
The Python integration code is as follows:
```python theme={null}
import requests
url = "https://api.acedata.cloud/captcha/token/hcaptcha"
headers = {
"accept": "application/json",
"authorization": "Bearer {token}",
"content-type": "application/json"
}
payload = {
"website_key": "a5f74b19-9e45-40e0-b45d-47ff91b7a6c2",
"website_url": "https://accounts.hcaptcha.com/demo"
}
response = requests.post(url, json=payload, headers=headers)
print(response.text)
```
## Asynchronous Mode (async)
By default, the API is synchronous and blocking: a request will wait until the token processing is complete before returning. If you are doing multi-solver rotation and want to "immediately get the task\_id after submitting the task, schedule other solvers, and come back later to get the result," you can pass `async: true` in the request body.
After passing `async: true`, the interface will immediately return a `task_id` without blocking:
```json theme={null}
{
"success": true,
"task_id": "61138bb6-19aa-11ec-a9c8-0242ac110002",
"trace_id": "2efa9340-b21b-4e26-9e14-4aac95f343ab",
"status": "processing"
}
```
Then use the `task_id` to poll `POST /captcha/tasks` (recommended every 3-5 seconds) to get the result:
```shell theme={null}
curl -X POST 'https://api.acedata.cloud/captcha/tasks' \
-H 'accept: application/json' \
-H 'authorization: Bearer {token}' \
-H 'content-type: application/json' \
-d '{
"task_id": "61138bb6-19aa-11ec-a9c8-0242ac110002"
}'
```
During processing, it will return `status: processing`:
```json theme={null}
{ "success": true, "task_id": "61138bb6-19aa-11ec-a9c8-0242ac110002", "status": "processing" }
```
When processing is complete, it will return `status: ready` and the token:
```json theme={null}
{
"success": true,
"task_id": "61138bb6-19aa-11ec-a9c8-0242ac110002",
"status": "ready",
"token": "P1_eyJ0eXAiOiJKV1QiLCJhbGciOiJIUzI1Ni......"
}
```
Billing Explanation: In asynchronous mode, creating tasks and polling "processing" do not incur charges; **only when successfully obtaining the token is there a charge once** (consistent with the price of synchronous mode). Therefore, canceling unfinished tasks during rotation will not incur costs. `/captcha/tasks` is applicable to all verification code interfaces (token and recognition series, such as hcaptcha, recaptcha2, recaptcha3, recognition/\*, etc.), and the same `task_id` can be used for polling.
## Error Handling
When calling the API, if an error occurs, the API will return the corresponding error code and message. For example:
* `400 token_mismatched`: Bad request, possibly due to missing or invalid parameters.
* `400 api_not_implemented`: Bad request, possibly due to missing or invalid parameters.
* `401 invalid_token`: Unauthorized, invalid or missing authorization token.
* `429 too_many_requests`: Too many requests, you have exceeded the rate limit.
* `500 api_error`: Internal server error, something went wrong on the server.
### Error Response Example
```json theme={null}
{
"success": false,
"error": {
"code": "api_error",
"message": "fetch failed"
},
"trace_id": "2cf86e86-22a4-46e1-ac2f-032c0f2a4e89"
}
```
## Conclusion
Through this document, you have learned how to use the hCaptcha protocol recognition API to allow users to bypass recognizing and clicking on hCaptcha verification code images, achieving automatic decoding in the background by simply submitting the Website Key. We hope this document can help you better integrate and use this API. If you have any questions, please feel free to contact our technical support team.